Hiking Half Dome in Yosemite: Everything You Need to Know
Hiking Half Dome in Yosemite National Park was an epic experience I will never forget! It’s the most iconic hike in Yosemite, for good reason. It’s a must-do for any hiker and definitely an adventure you’ll want to add to your bucket list.
But before you start packing your bags, an adventure like this comes with some much needed prep work. In this blog post, I’ll share everything you need to know before hiking Half Dome and tips to make it an incredible experience.
This post is all about Hiking Half Dome in Yosemite.

Half Dome Lottery and Permits
How to Apply for a Permit
First things first – you’ll need a permit to hike Half Dome. The permit system is in place to limit the number of hikers on this popular trail and ensure a safe and enjoyable experience.
The Half Dome lottery takes place from March 1 to March 31 each year, and you can apply for up to six permits per application via Recreation.gov.
The cables for Half Dome are usually installed on the Friday before Memorial Day in May and are taken down on the day after the second Monday in October.
The weekends are popular! You have a better chance at getting selected if you include weekday availabiltiy. We submitted for both weekdays and weekends, and got accepted for a Friday permit in August.
The lottery is random, so there’s no guarantee that you’ll get a permit, but it’s worth a shot. Results of the lottery are sent via email in early April, or you can check online.
If you plan to spend the night in Little Yosemite Valley as a backpacker, it’s recommended that you apply for Half Dome permits along with your Wilderness Permit.
What if I Don’t Get Selected for a Half Dome Permit?
You can also try for a secondary lottery two days before your desired hike date. The park service holds back a limited number of permits that can be obtained through a first-come, first-served basis two days in advance from the Wilderness Center in Yosemite Valley.
And if you’re really desperate and unlucky with the methods above, there were some people waiting near the Ranger Station asking groups if they have any openings on their permit (ie. a permit for 4 people, but only 2 hikers). Some have had success doing this, but it seems risky! I don’t recommend it, but if you try it let me know how it goes!
Where to Sleep Before Hiking Half Dome
If you’re planning on hiking Half Dome, the easiest option is to stay in or near the park the night before to avoid any early morning stress. Yosemite National Park has several sleeping options from camping to lodges, depending on your preference and budget.
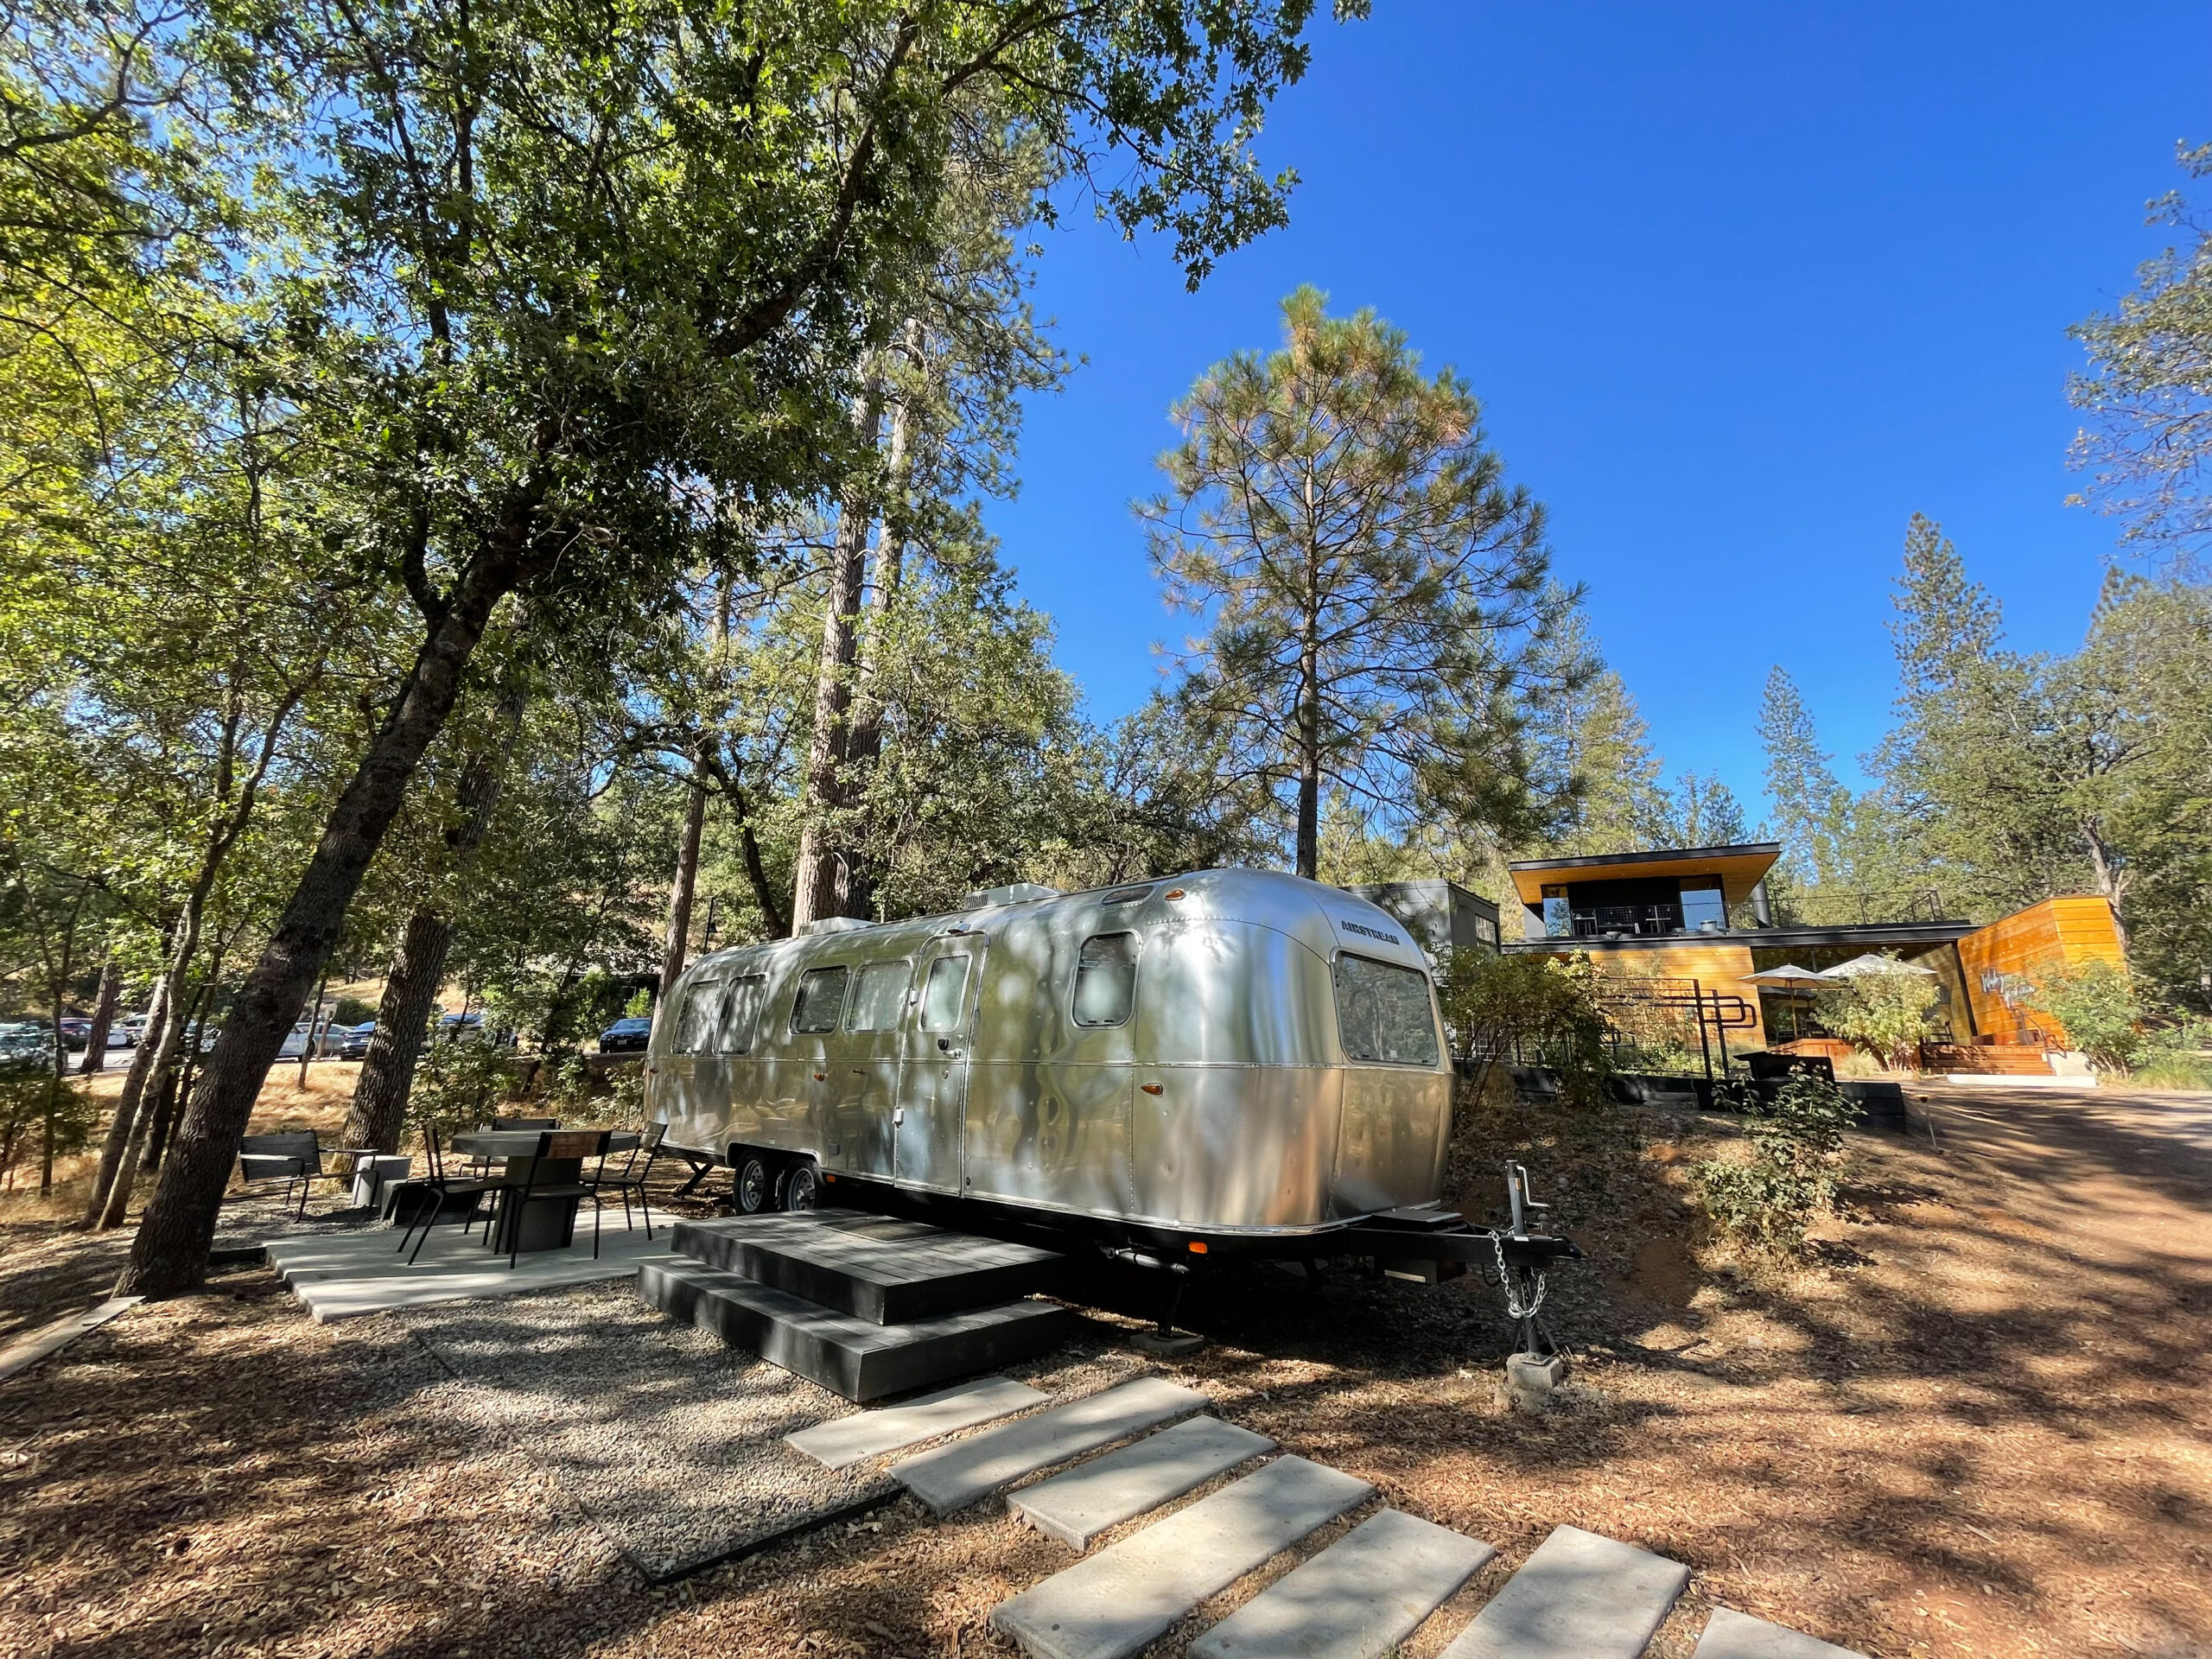
Airstreams at Autocamp Yosemite
We stayed in an Airstream 30 minutes outside of the park in Midpines at Autocamp, and I would definitely do it again! It was reasonable priced and relatively close to the park entrance.
The best part is that we could still “camp” with our own campfire and be in nature, but enjoy all the amenities of the lodge and the air-conditioned Airstream. After a long day of hiking, we were thrilled to sleep in a comfy bed and have a hot shower waiting for us. Highly recommend!
Read all about our stay and what to expect in my Autocamp Yosemite Glamping Review.
Camping Near Half Dome
If you plan on camping near Half Dome, you’ll want to make a reservation well in advance, as campgrounds tend to fill up quickly. We weren’t able to find any advance camping reservations inside the park for our August trip, so book early! You can still try for the first-come first-serve spots at Camp 4, but they fill up quickly in the spring and summer.
For the rugged campers who also get a Wilderness Permit, Little Yosemite Valley is about half-way up the summit to Half Dome which gives you quick access to the trail. This is the only way to break up the hike into two days, rather than a full day.
The campgrounds are very minimally developed, meaning no drinking water and you pack out your trash. You’ll have to hike up to the site with your tent and it’s pretty rugged camping. I like to think that I’m laid back, but I’m not that hard core… Autocamp for me!
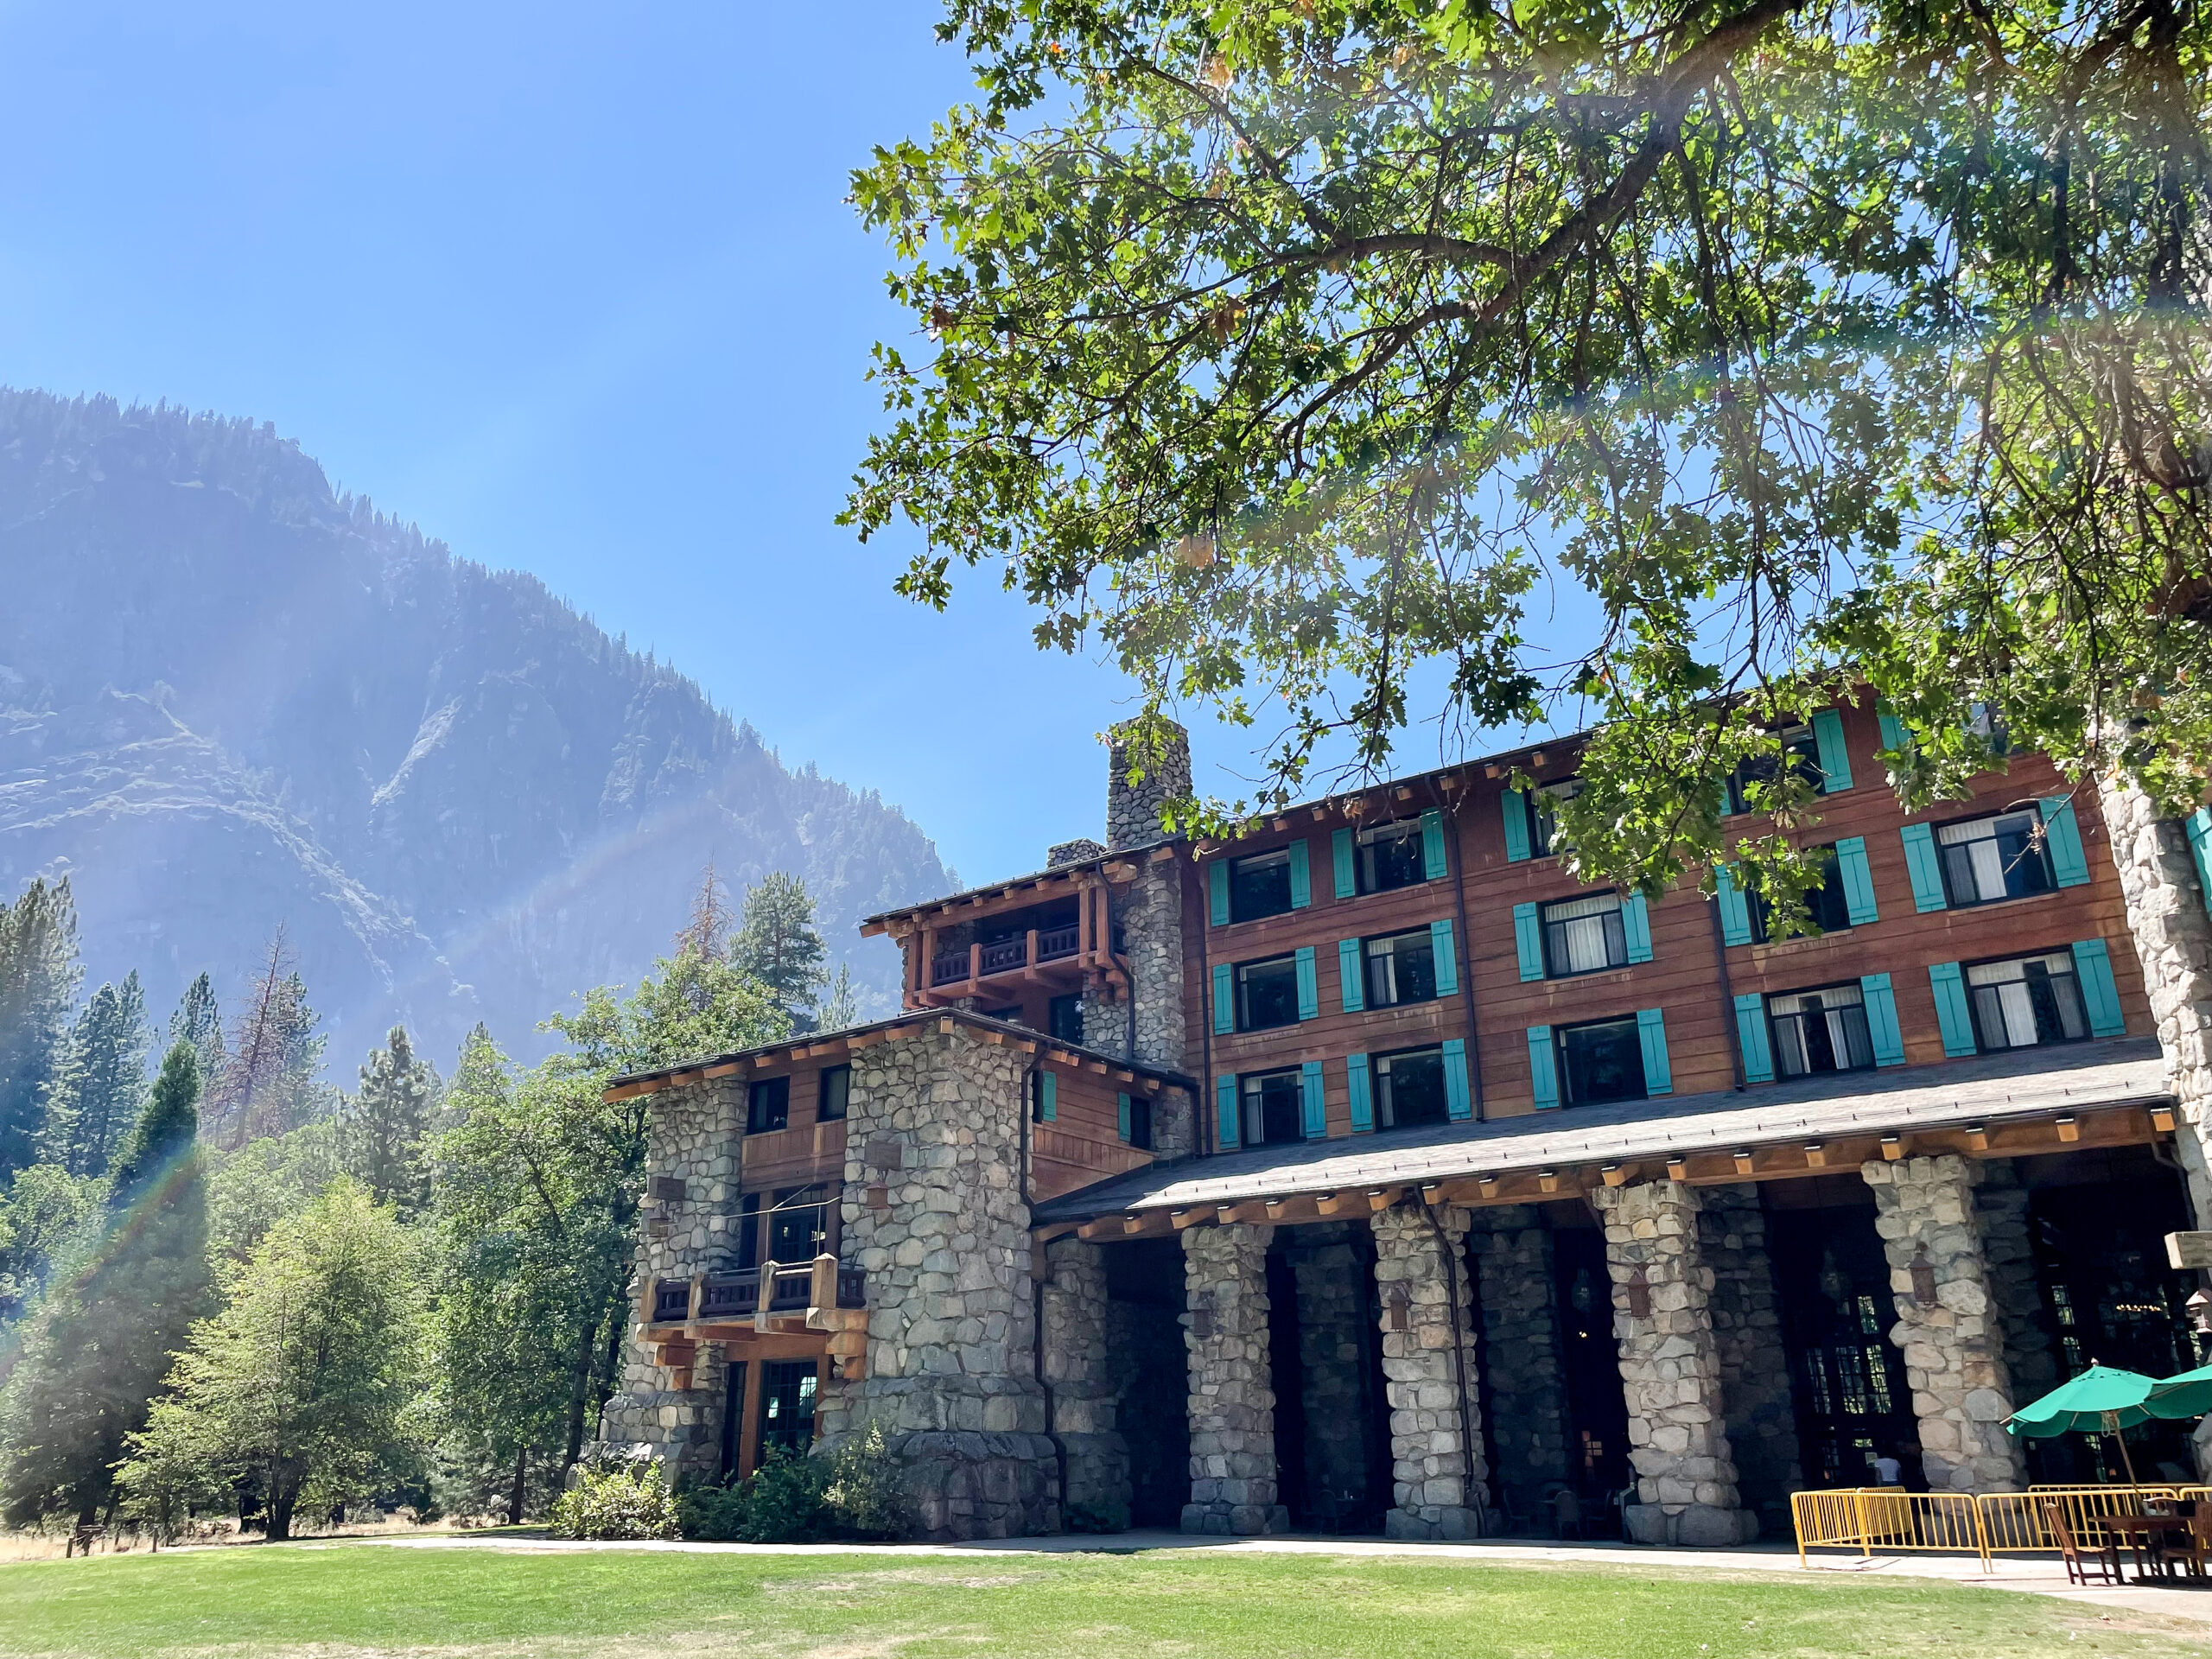
Hotels Near Half Dome
If you prefer a more comfortable stay, Yosemite Valley Lodge or the Ahwahnee Hotel are excellent options inside the park. But they are also popular, and can have high rates in the peak seasons.
Side note… Ahwahnee has the BEST breakfast buffet (or you order a la carte) and the dining room is stunning! Go ahead and reserve that as a treat for yourself the day after your hike.
Still not sure where to stay?
Here are 7 Unique and Cozy Bed and Breakfasts Near Yosemite that will not disappoint.
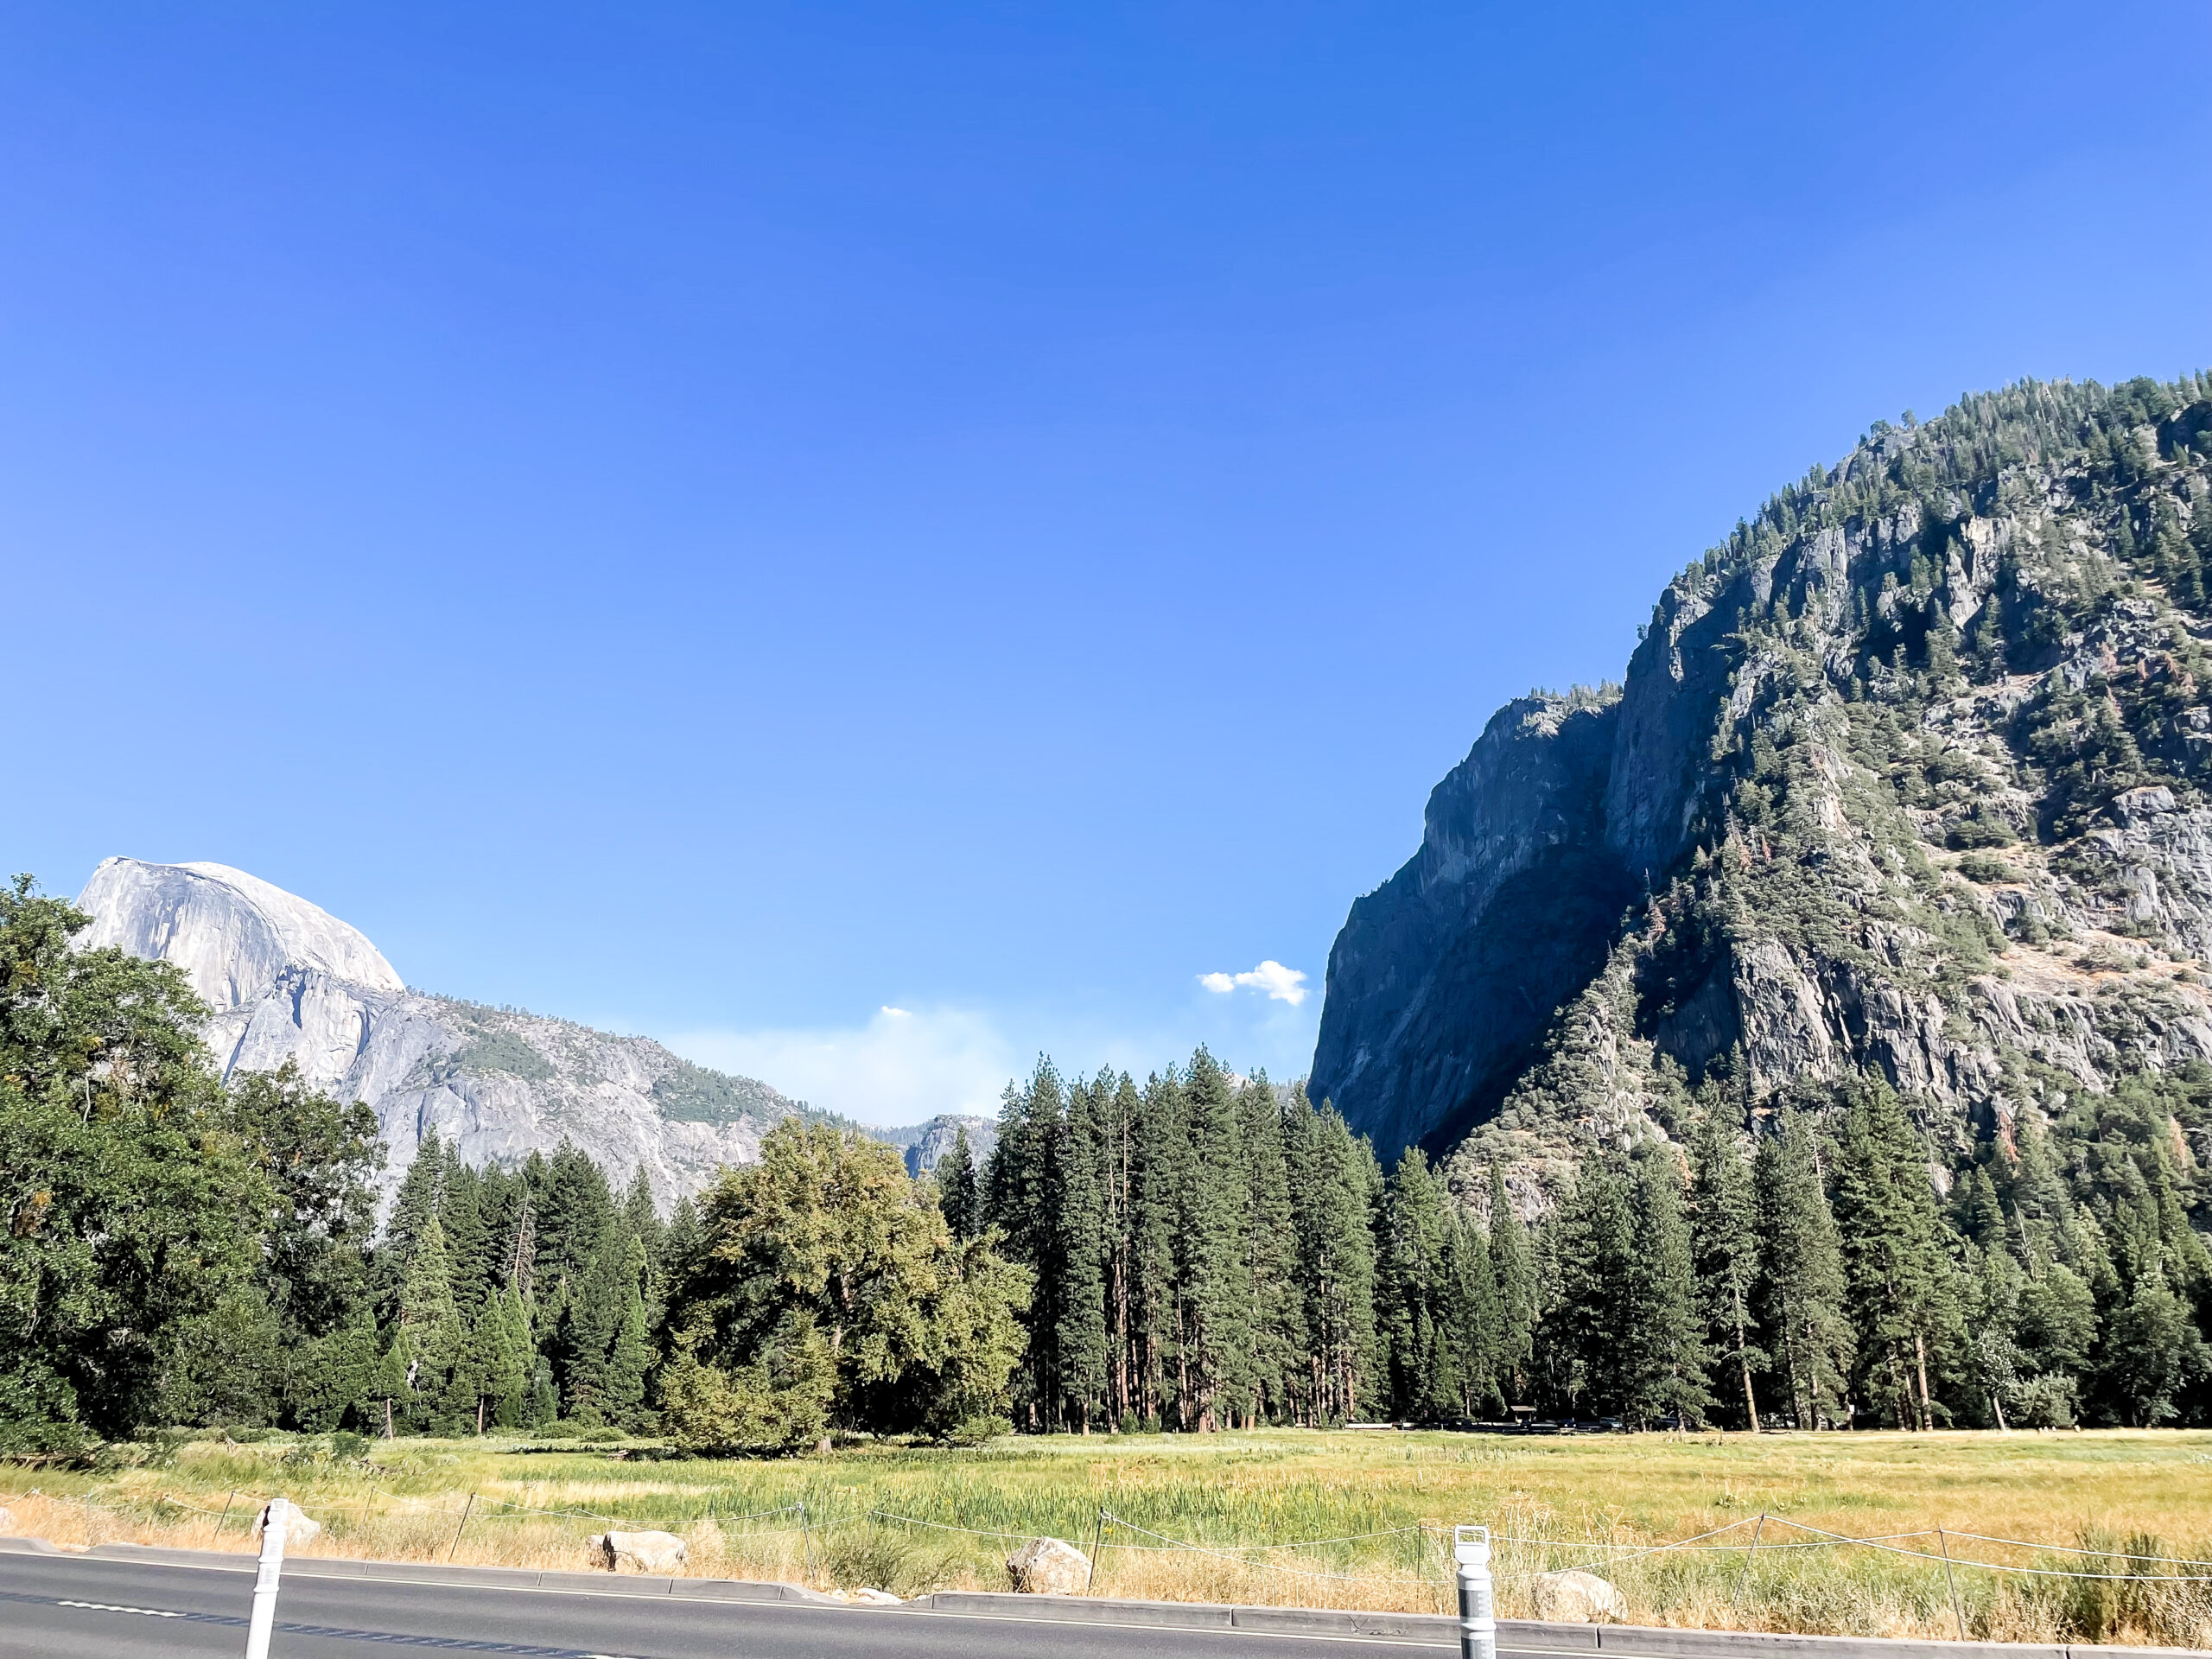
Parking for Half Dome
The trailhead for Half Dome starts at the Happy Isles Trailhead in Yosemite Valley.
The closest parking it at the Yosemite Valley Trailhead Parking, but it does tend to fill up. Another reason to start early! When we got there around 6:30am, it was about half full.
Another option is to park in the Curry Village parking lot and take the park shuttle to the trailhead. This parking lot also tends to fill up quickly, so arrive early or consider taking the park shuttle from your accommodation.
It’s essential to remember that parking violations are strictly enforced in the park, and fines can be expensive. Avoid parking on the side of the road or in areas not designated for parking.
How Hard is Half Dome?
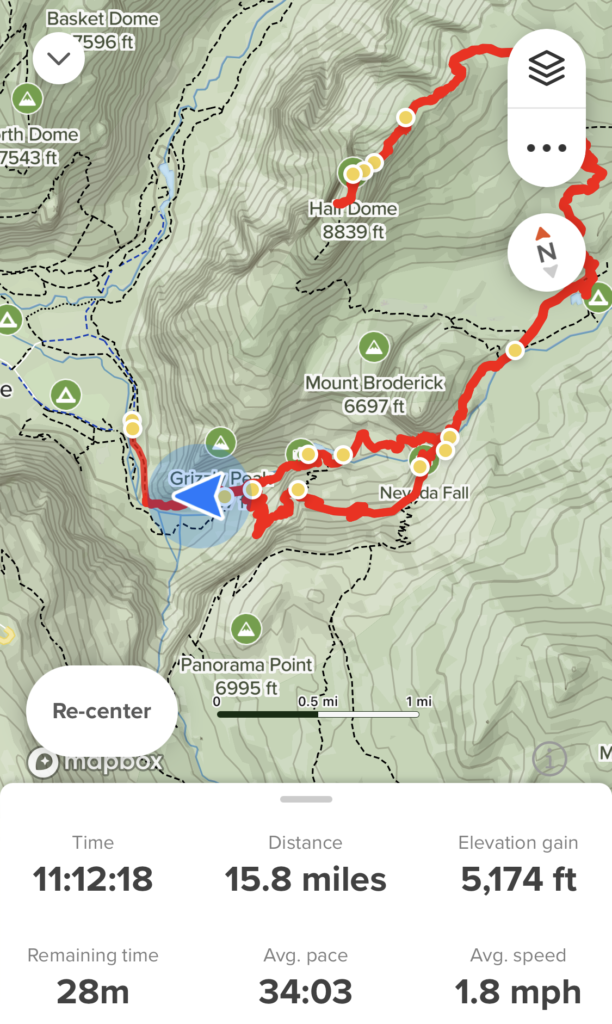
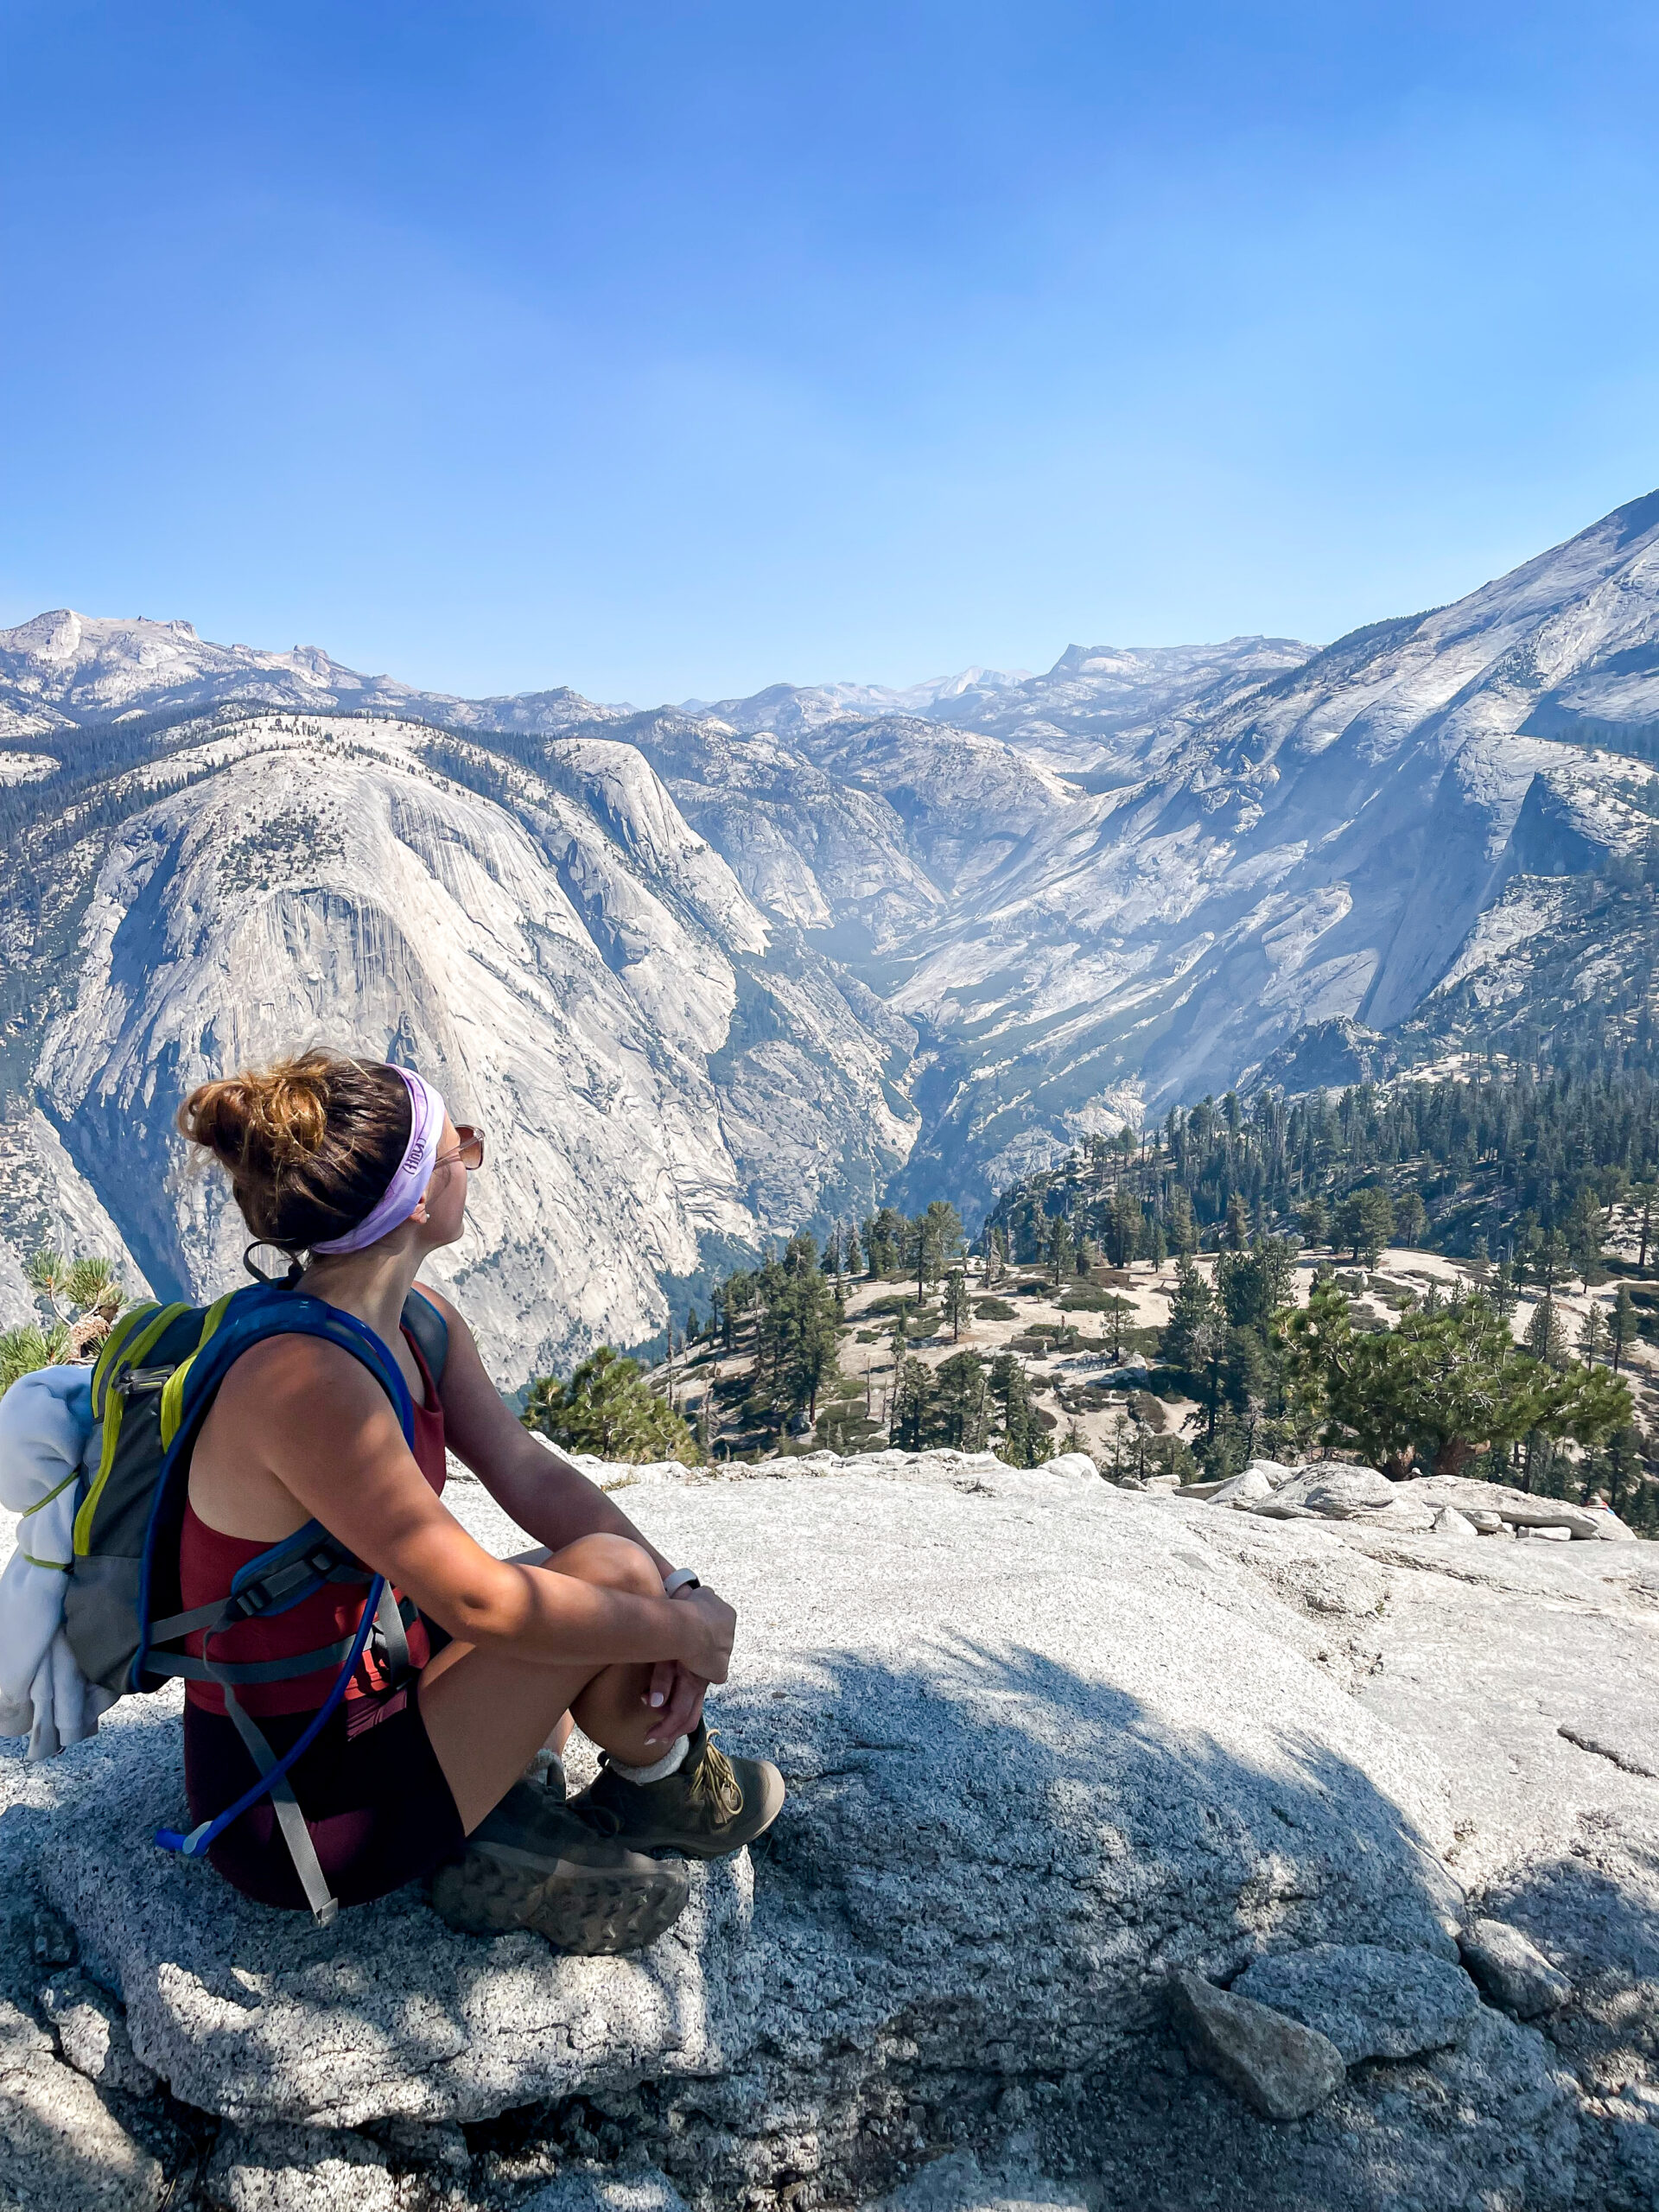
Hiking Half Dome is definitely a challenge, but it’s doable for most people with a good level of fitness. The trail is 14-16 miles round-trip (depending on the route you take) and gains about 4,800 feet in elevation.
The most challenging (and fun!) part of the hike is the ascent up the cables. The cables are about 400 feet long and have a 45-degree incline. You climb the cables while holding onto the metal poles to reach the summit. So after hiking nearly 8 miles, you need some upper body strength to accomplish this, but I didn’t find it to be very difficult.

For me, the endurance of the full-day 16-mile hike was the difficult part! But it was super rewarding and definitely possible if you train a bit, pace yourself, and prepare.
How to Train for Half Dome
You will be hiking over steep terrain and ascending over 4,800 feet in elevation. It’s essential to prepare your body for the challenge by training beforehand.
Start with hiking shorter trails, gradually increasing the distance and elevation gain. Focus on building your endurance by including cardio and strength training exercises in your workout routine.
Try out your hiking shoes in advance to make sure they are comfortable and supportive. Carry a backpack with weight to simulate the load you will be carrying on the hike.
We live in Los Angeles which has plenty of great hiking trails! So we prepared by doing smaller hikes like Runyon Canyon, Moab Cave, and Calabassas Hidden Stairs. But you can train by doing long walks or runs to build endurance.
What to Bring
Real talk: this whole experience would have been wildly different if our friends hadn’t encouraged us to get the right gear. I was planning on wearing my Nike tennis shoes and bringing a water bottle. I’ve gone on hikes before, how much harder could it be?… WRONG. Thank God for good friends who made sure I was prepared.
The right gear is essential for hiking Half Dome! In my blog post Hiking Packing List: Day Hike Essentials, I go more in depth on what to bring. But I’ve put together a list of the highlights below.
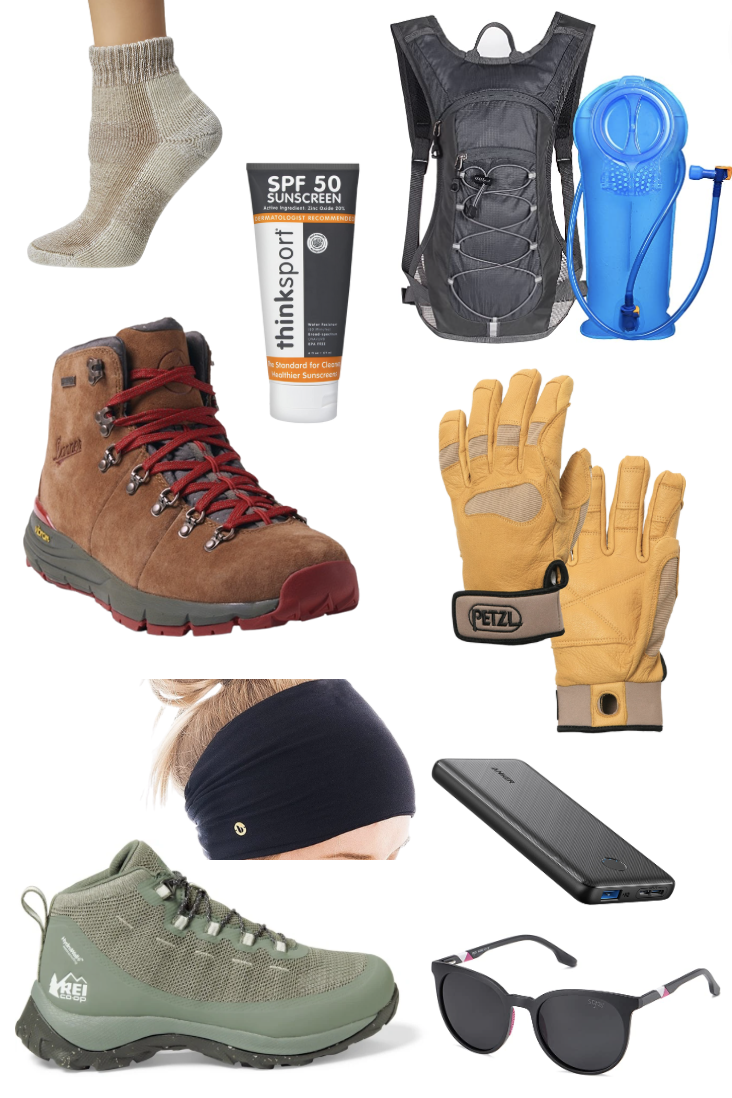
- REI Women’s Hiking Boots
- Danner Men’s Hiking Boots
- 2L or 3L Hydration backpack – MUST DO! + extra water if you can.
There is no drinking water along the route. I went through my 2L water pack about 70% of the way. My husband used his entire 3L hydration pack as well. I’d recommend to bring a full hydration pack + a water bottle or two. - Women’s Max Cushion Ankle Hiking Socks
- Petzl Hiking Gloves
- Sport Sunscreen
- Headband
- Portable Charger
- Sunglasses
- Lunch and lots of snacks like nuts, protein bars, and meat sticks
As an Amazon Affiliate, I earn from qualifying purchases at no cost to you.
How Long Does it Take to Hike Half Dome?
The average hiker takes 10-14 hours to complete the hike to Half Dome and back, including breaks and time at the summit. However, the time it takes can vary depending on your fitness level and the pace you set. It’s essential to start early and pace yourself throughout the hike to avoid exhaustion.
We did the full hike in just under 12 hours at a comfortable pace. We made several short stops and we did hang out at the summit for about 30 minutes. We took the Mist Trail on the way up and the John Muir Trail on the way down.
What Time Should I Start?
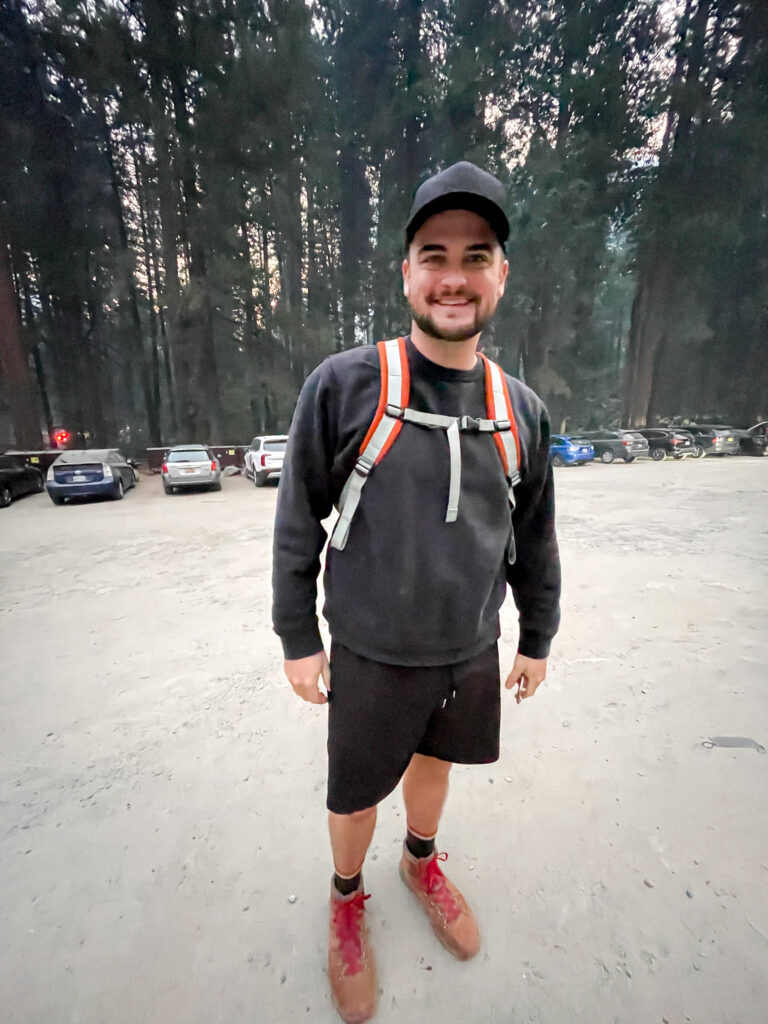
Starting early is essential to avoid the crowds and to ensure you have enough daylight. We left our Airstream at about 5:45am and parked around 6:30am before starting the hike.
Fortunately, we were super excited so it wasn’t difficult to get up and going WAY earlier than normal 🙂

Mist Trail vs. John Muir Trail
The hike to Half Dome splits into two paths that you can take, which eventually meet up again near Nevada Falls before you ascend to the summit:
1. Mist Trail
2. John Muir Trail
We decided to take the Mist Trail up and the John Muir Trail down. The Mist Trail is shorter but more strenuous, while the John Muir Trail is longer but less steep.
Mist Trail
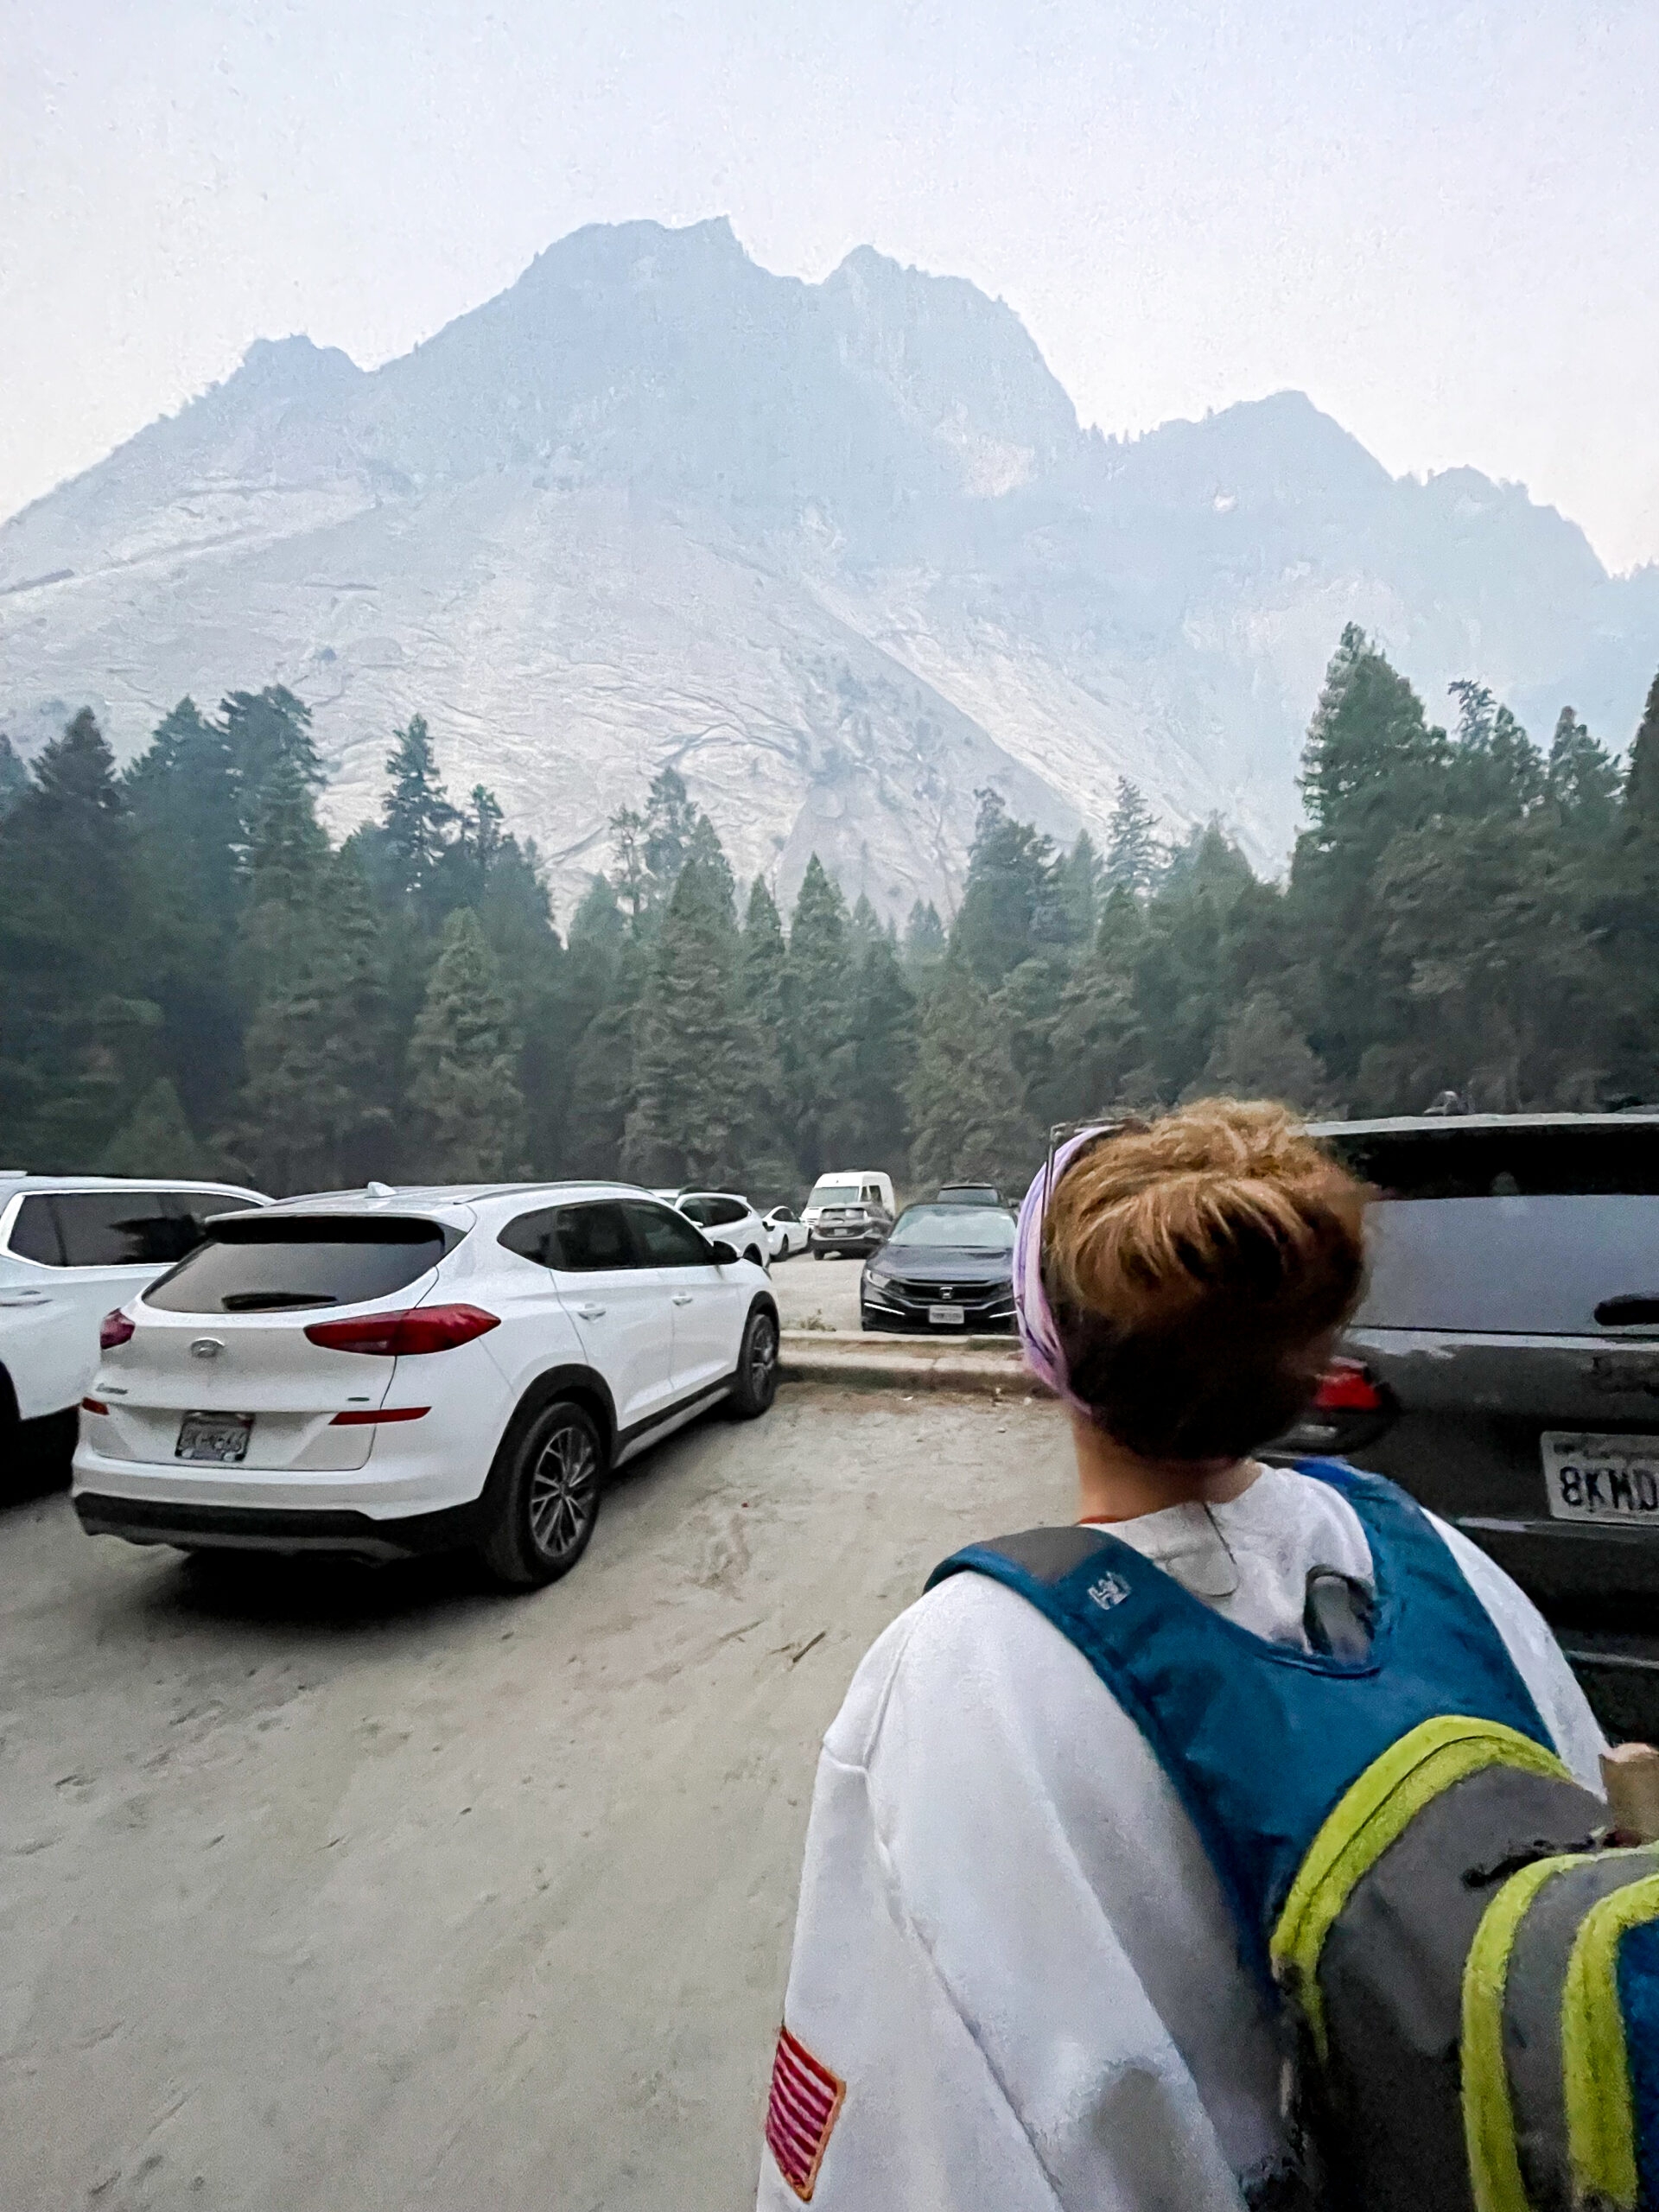
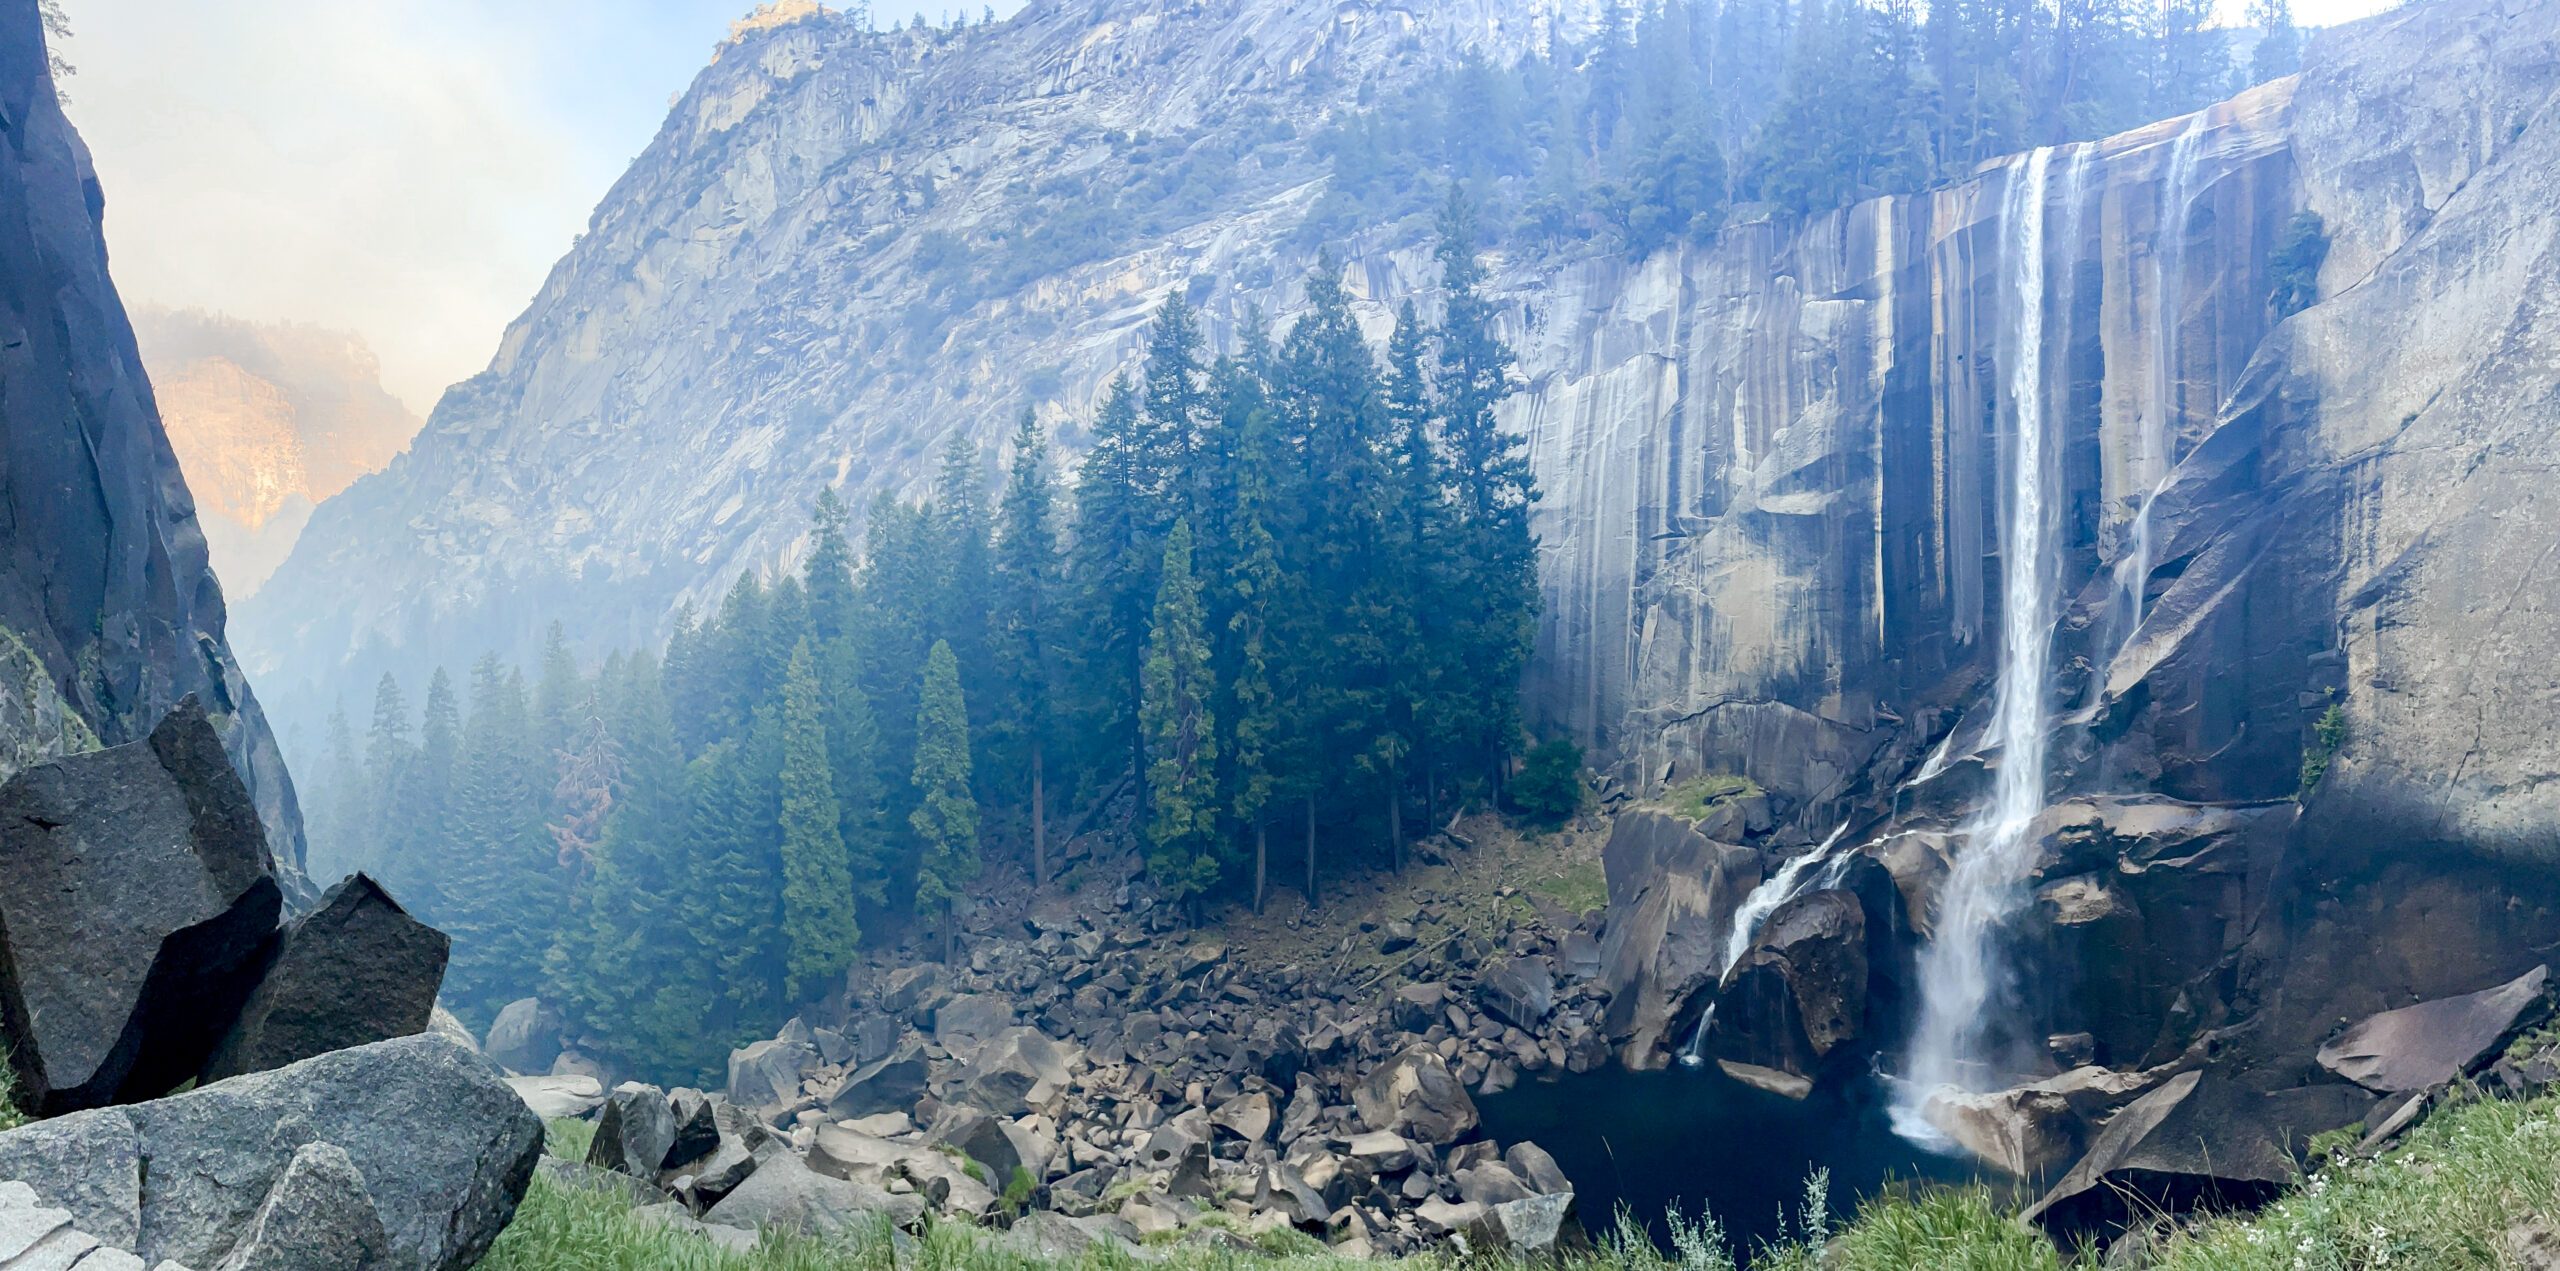
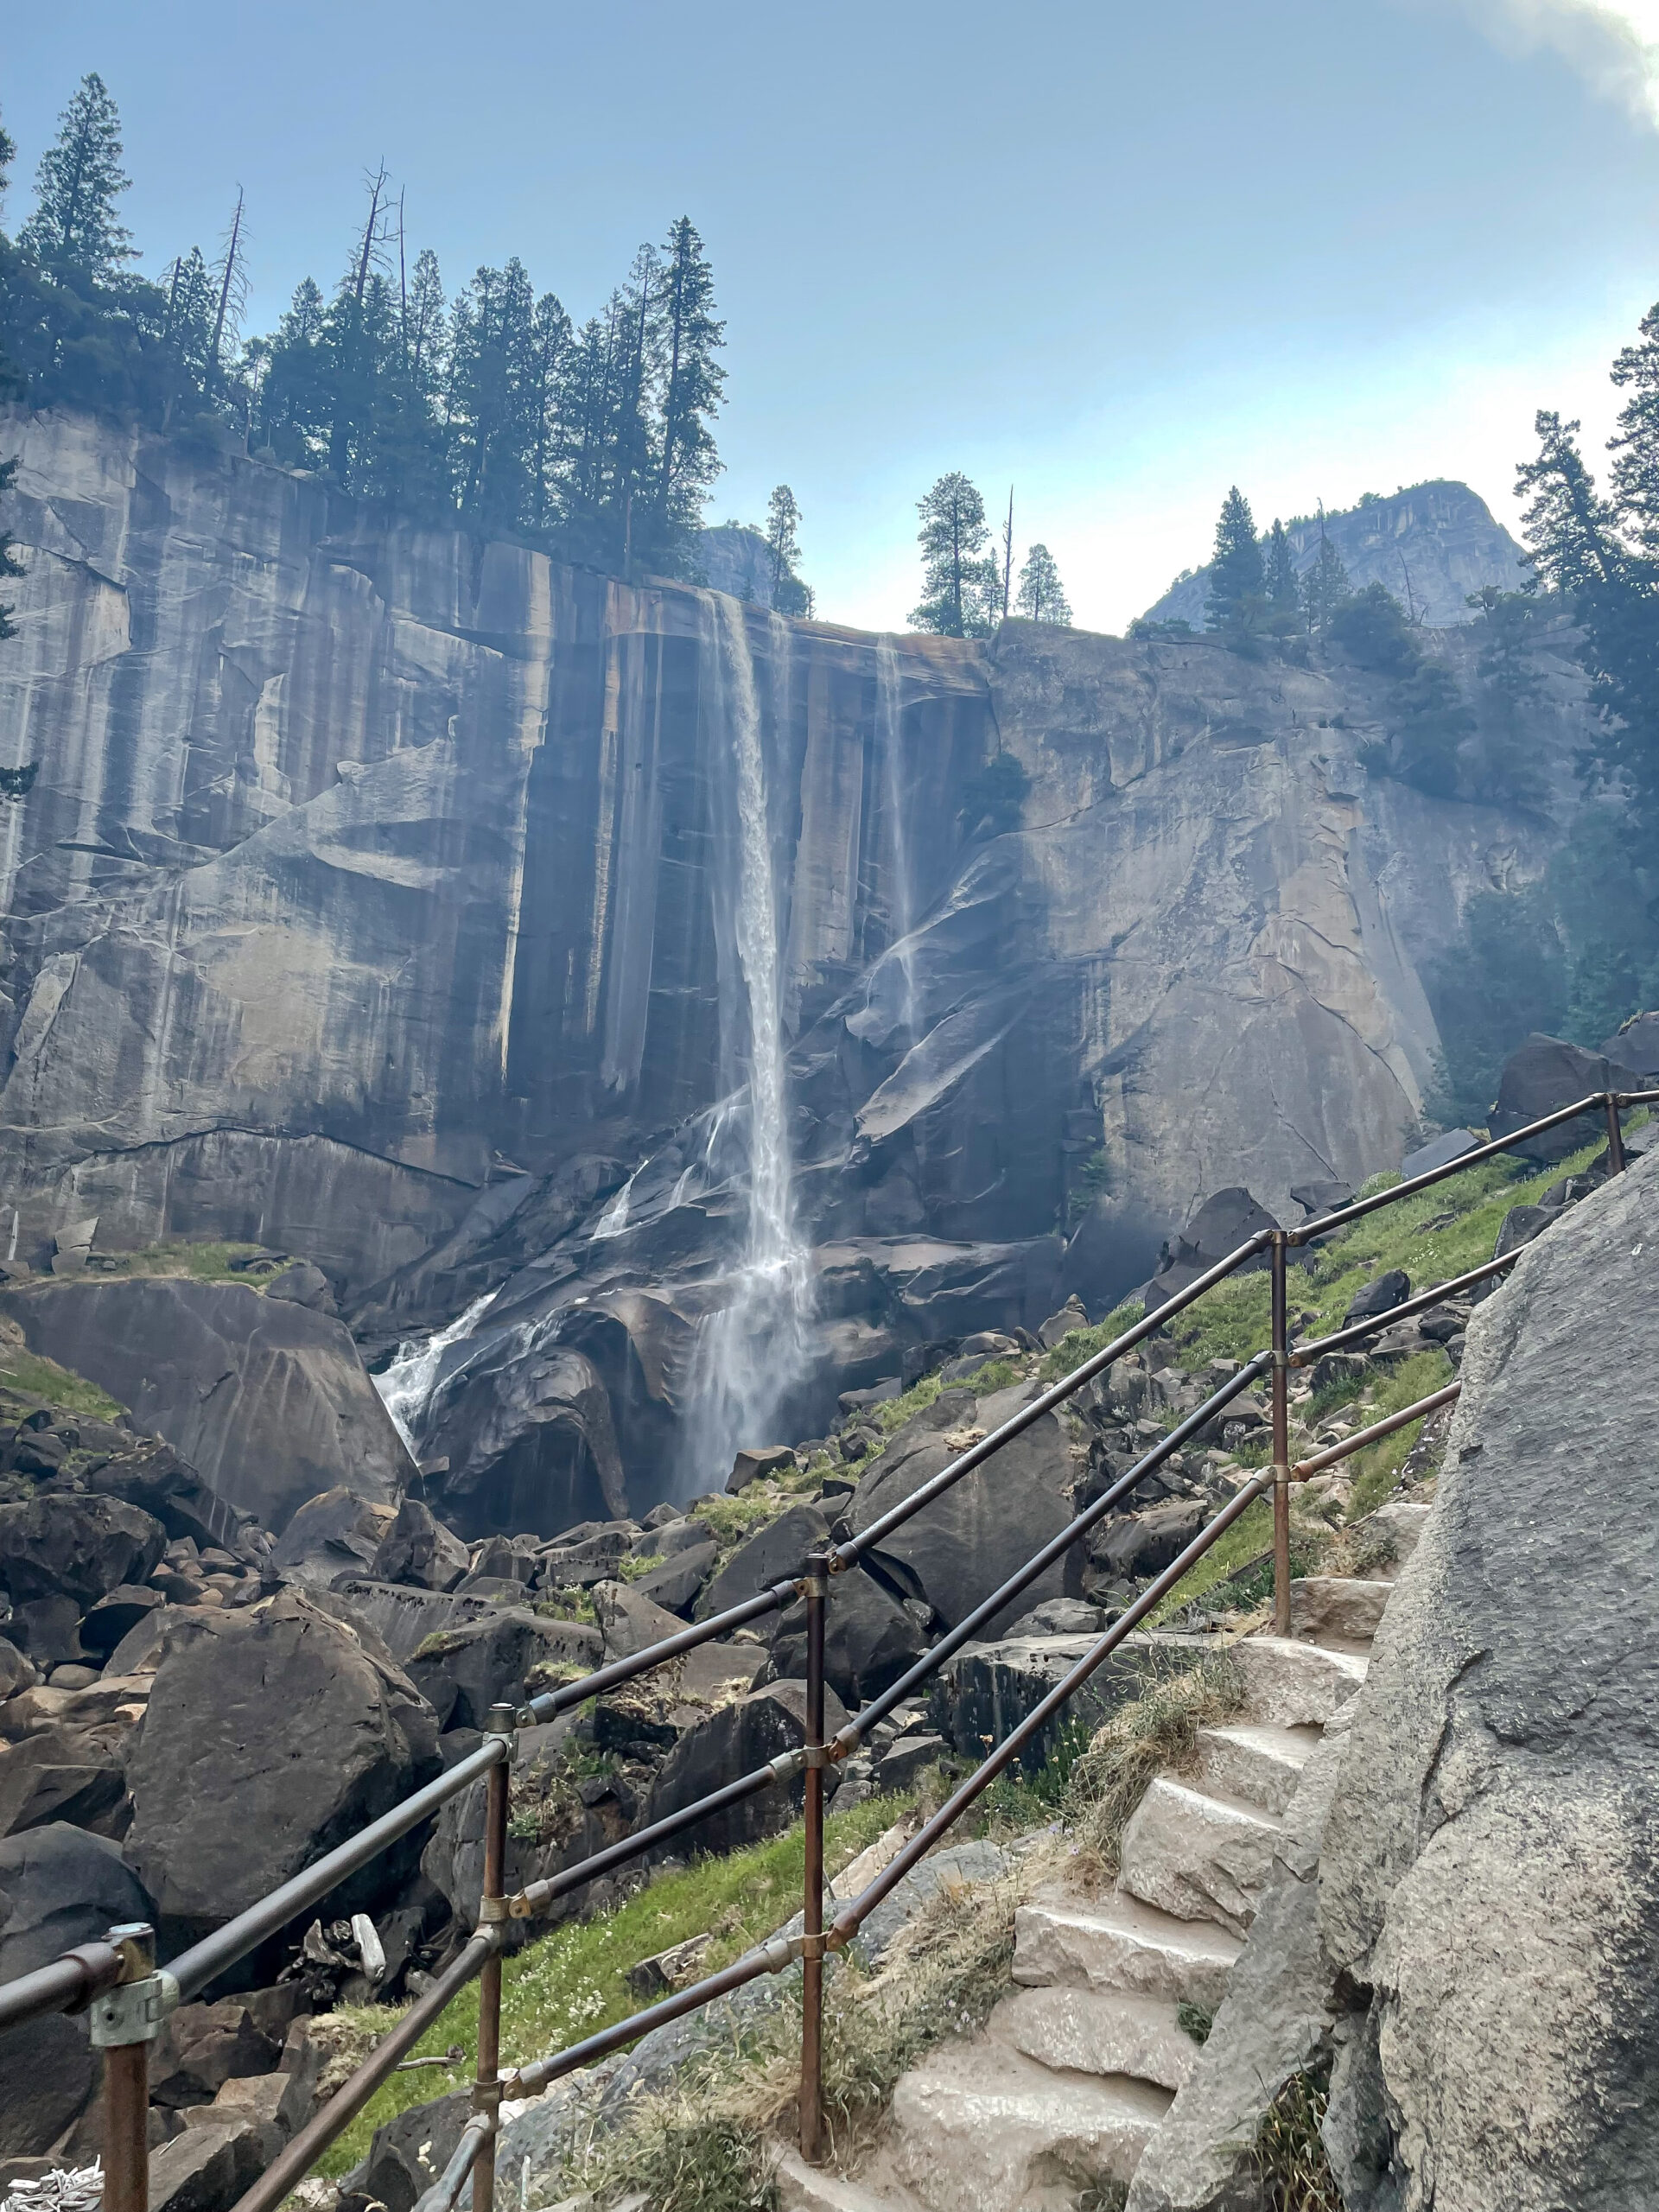
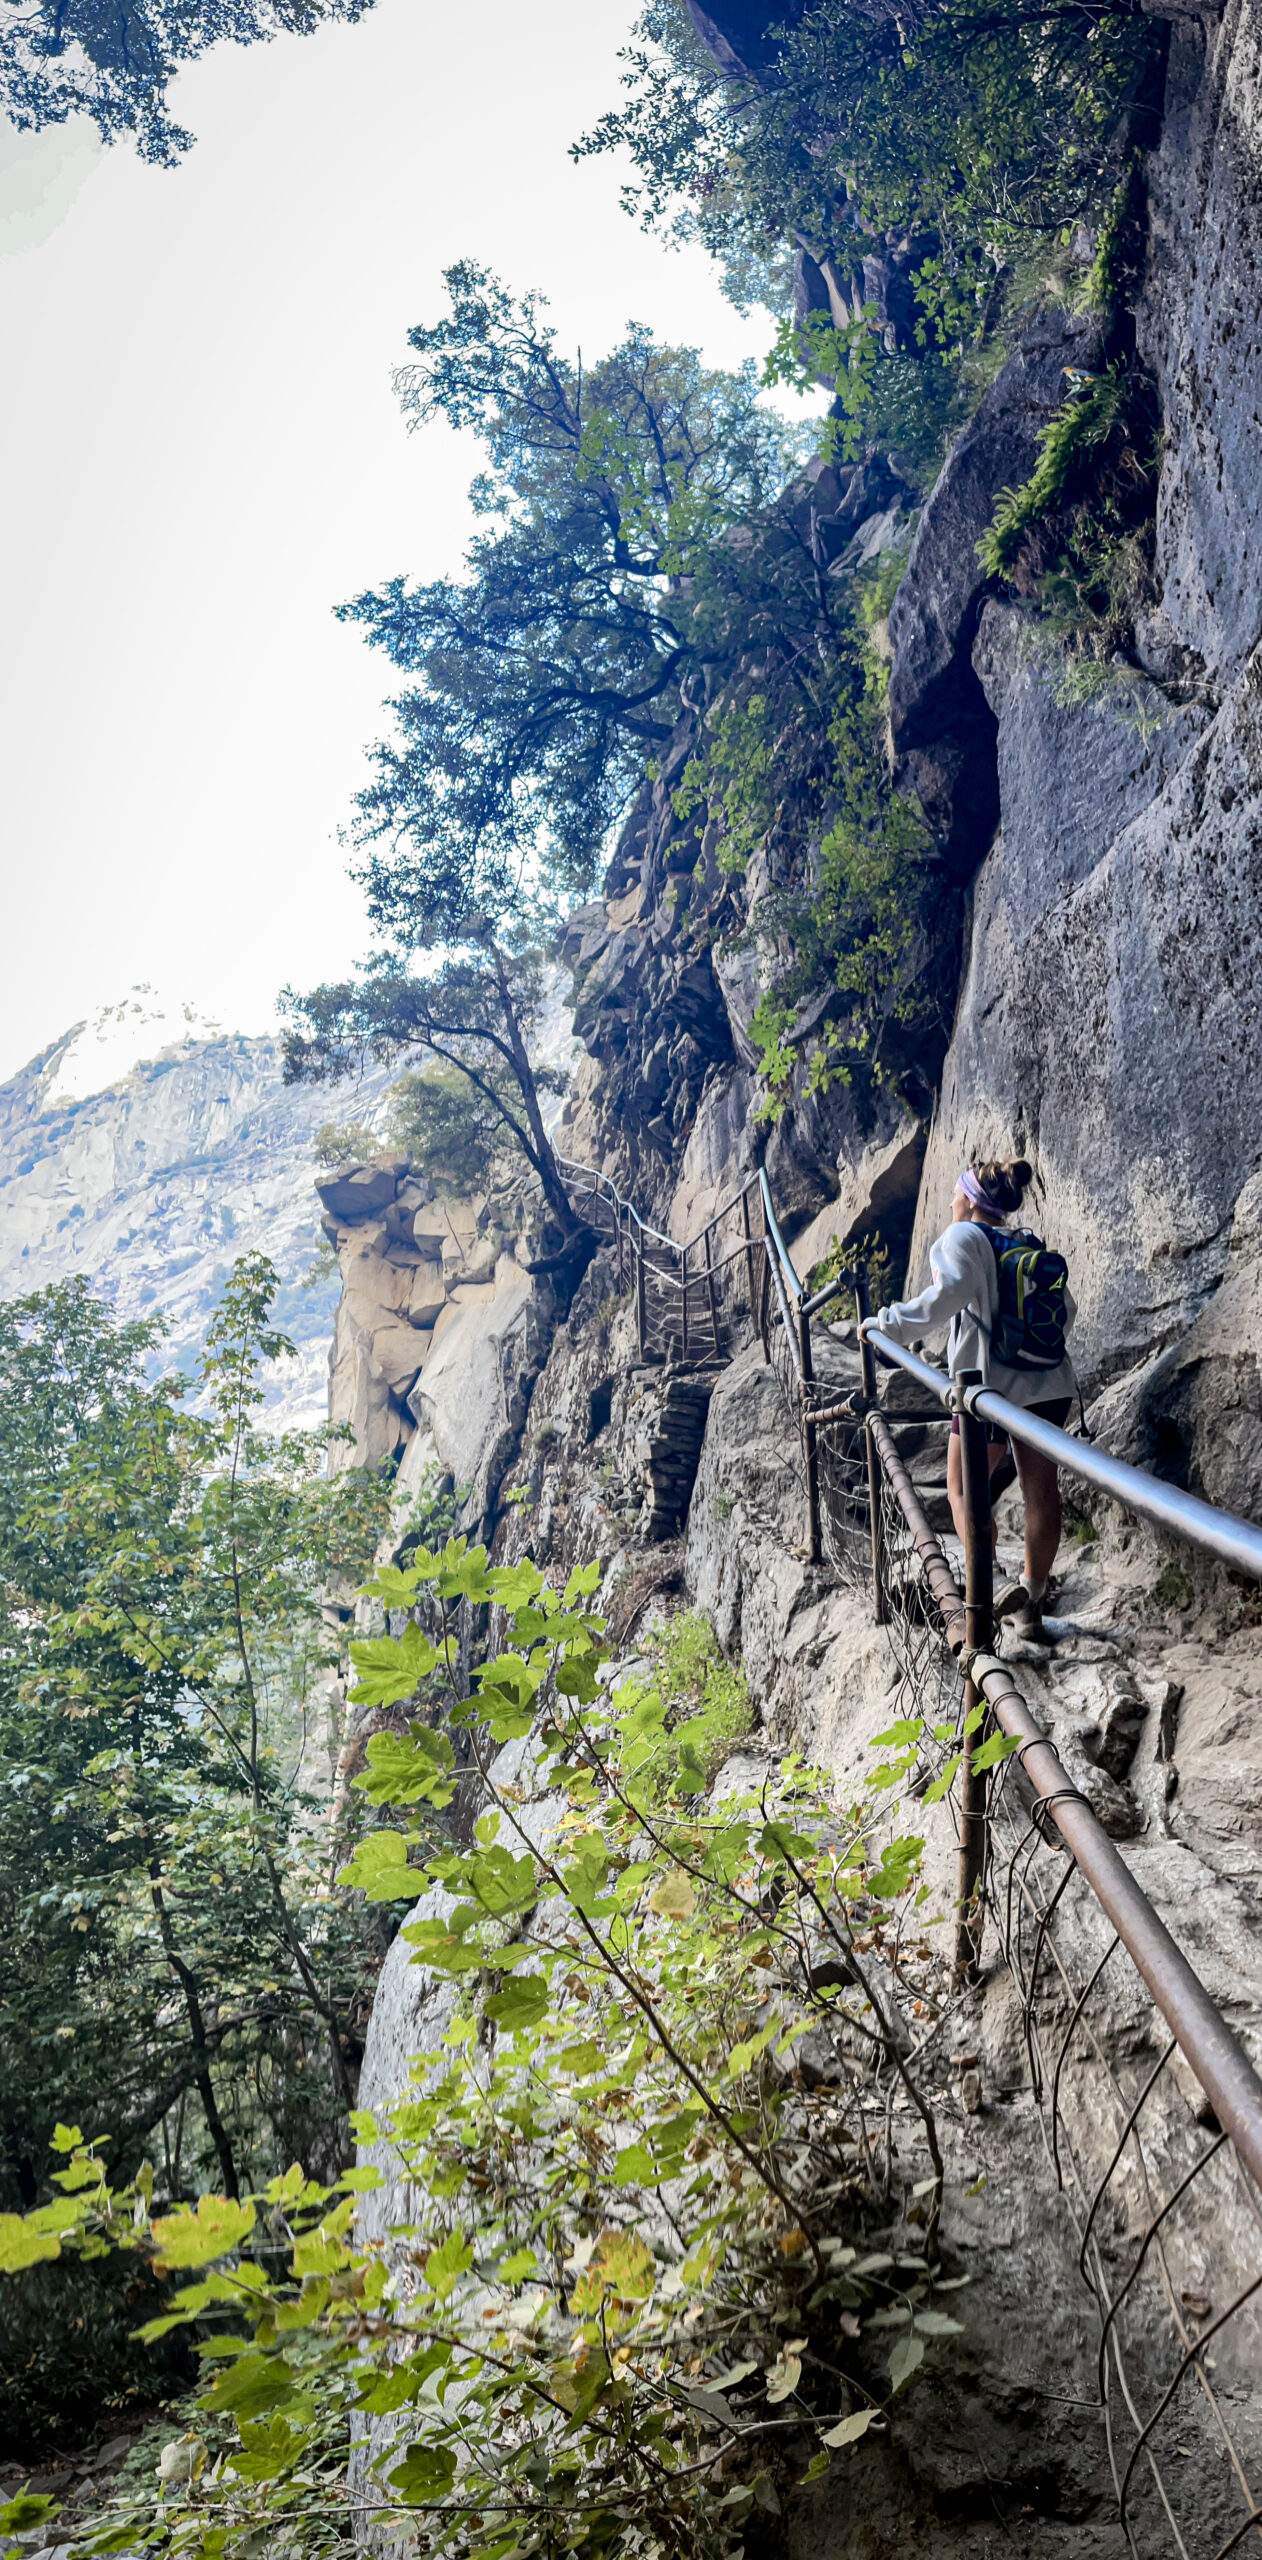
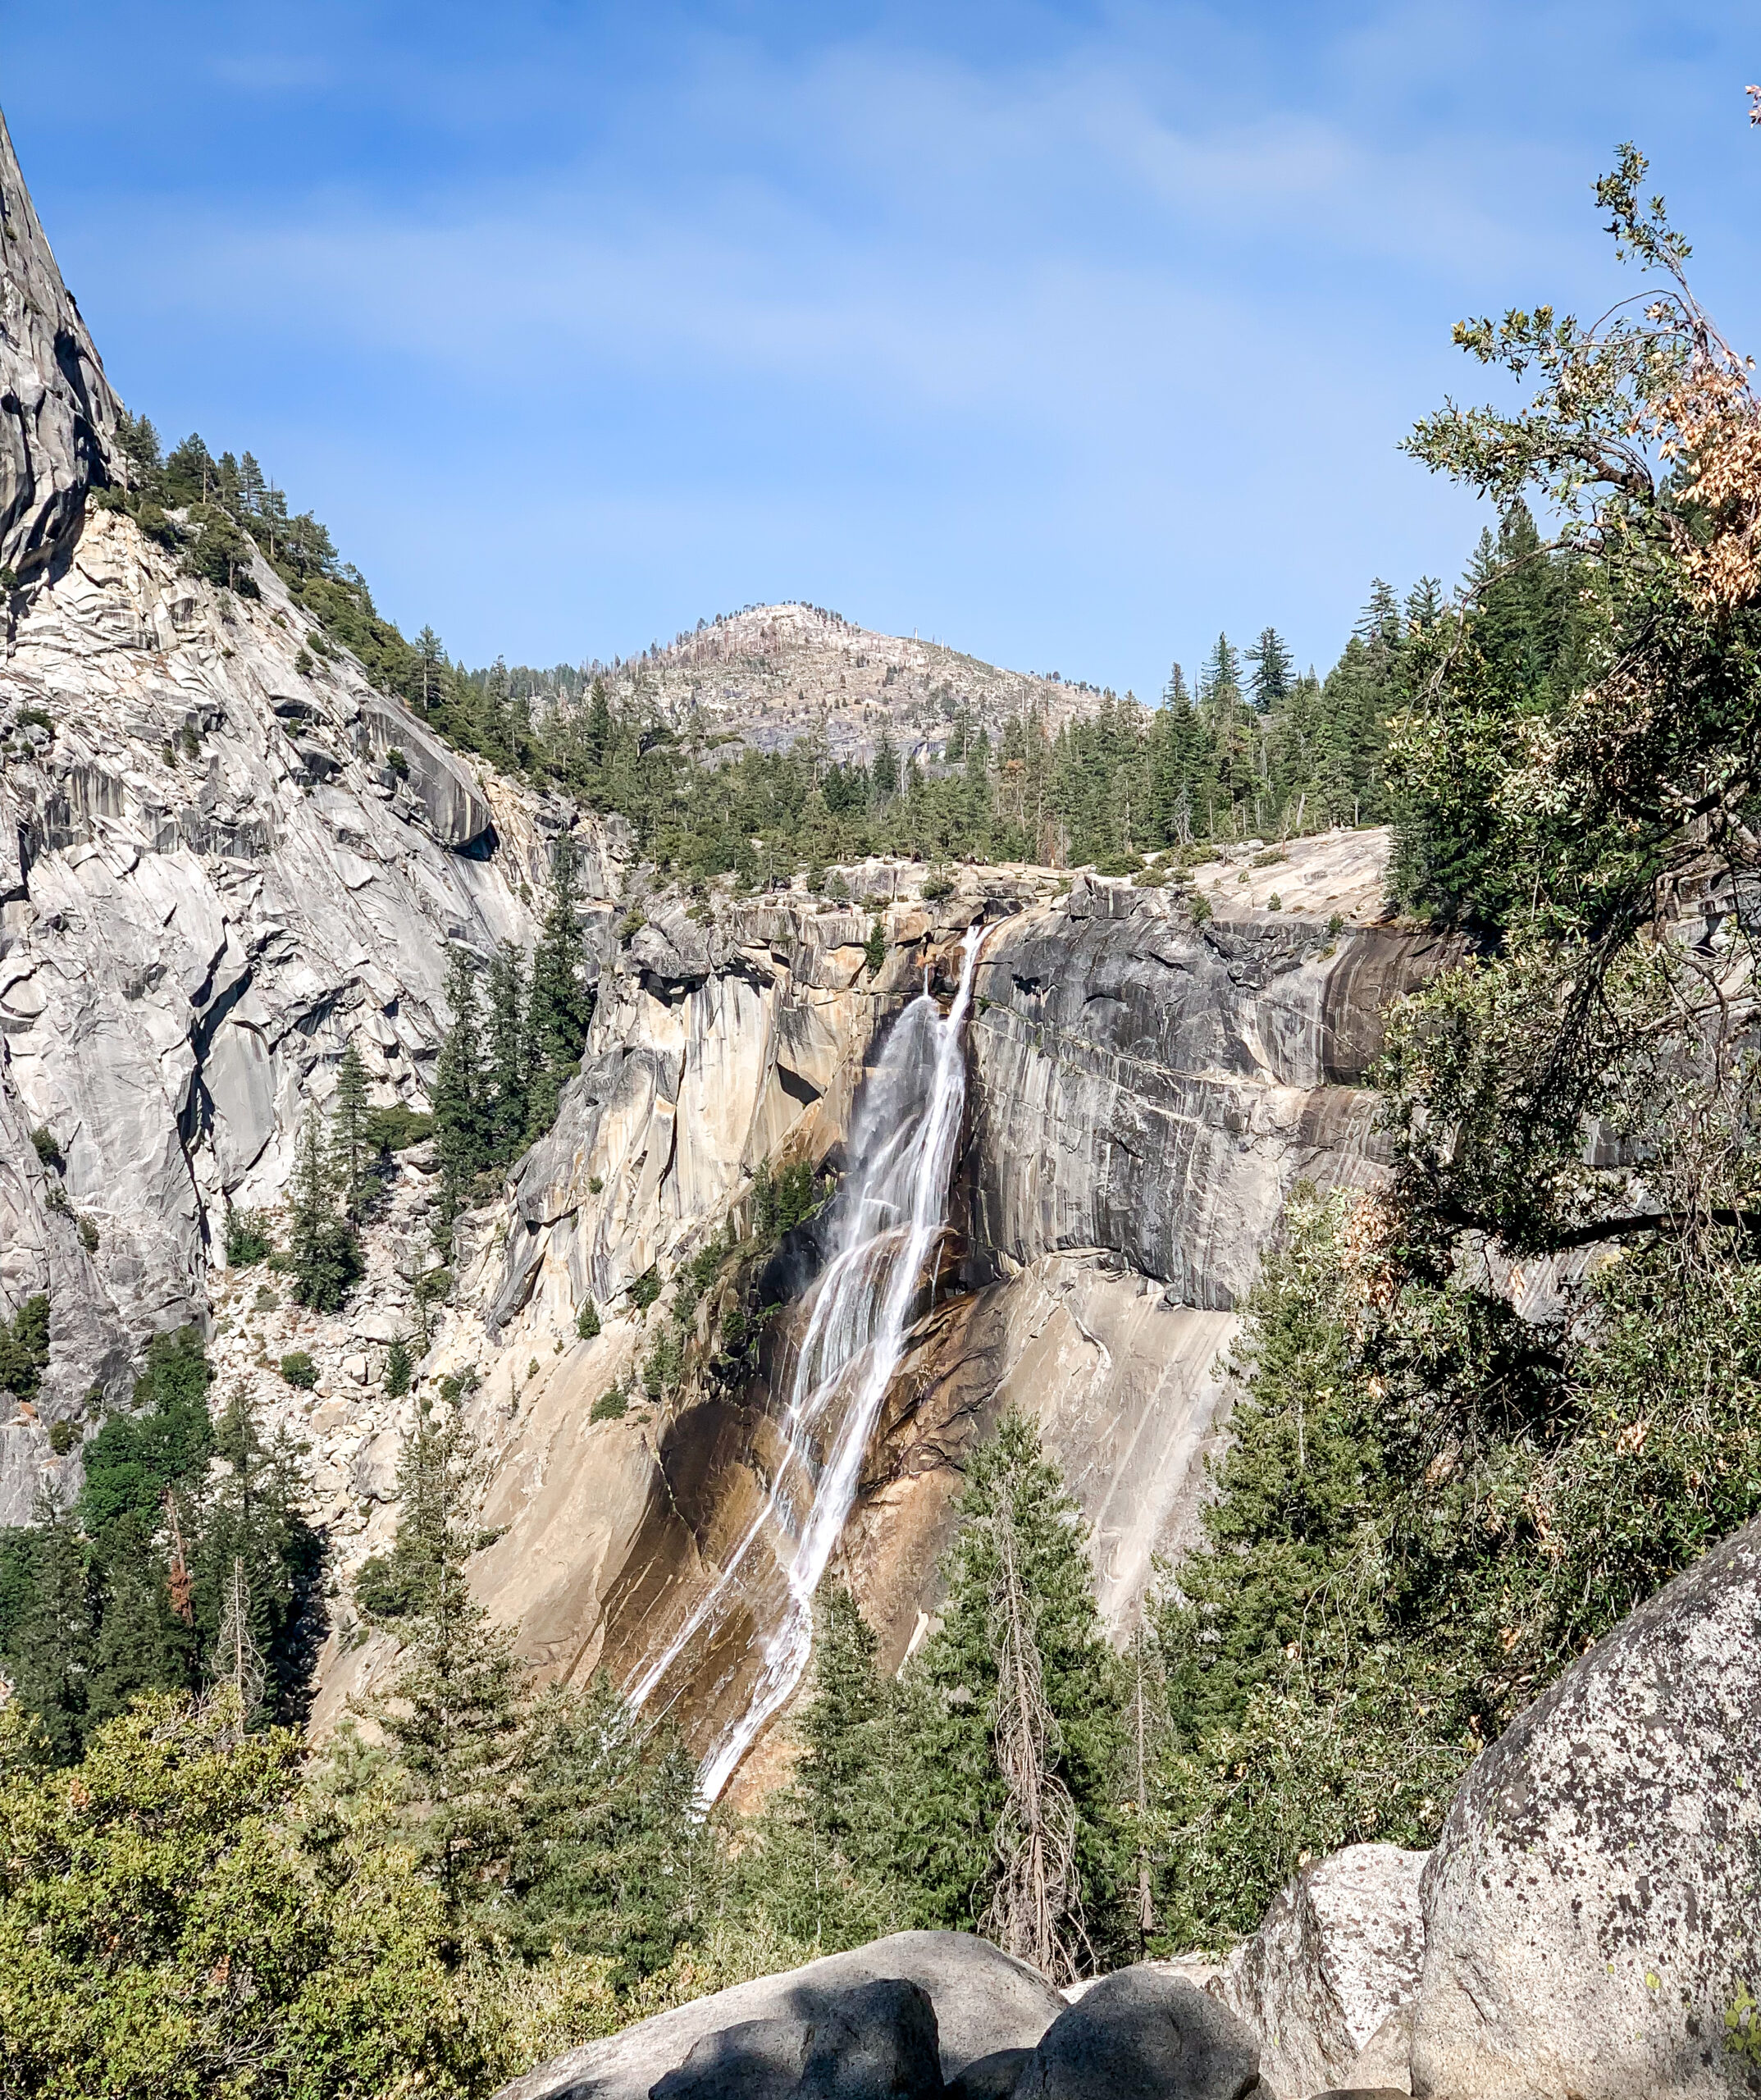
Pros: Shorter route with amazing views! The Mist Trail starts at the Happy Isles Trailhead and takes you up a series of steep granite steps alongside Vernal Falls and Nevada Falls. The trail is known for its incredible views of the waterfalls and the surrounding valley.
There was a fire in the surrounding area the day we started, so our views were pretty hazy but we could still see a lot. It was such a peaceful and serene start to the hike! This picture is of Vernal Falls part way through the Mist Trail.
Cons: The Mist Trail can be crowded during peak season, which can slow you down if you don’t start early enough. And the steps can be slippery, especially in the spring and early summer when the waterfalls are at their peak!
John Muir Trail
Pros: The John Muir Trail is not as steep as the Mist Trail and easier to maneuver. There are also some incredible views of the Valley.
Cons: Taking the John Muir trail route adds about 1.5 miles to the trip. The gradual decline was a nice break after climbing stairs, but I found it to be a bit boring at times. I’m glad we tried it so that we could experience both routes. But if we do the hike again, I would probably prefer to take the Mist Trail both ways.
Nevada Falls
Whichever route you decide will take you to the beautiful 594-foot Nevada Falls.
Great news, you’ll also find a public restroom here near the end of the Mist Trail!
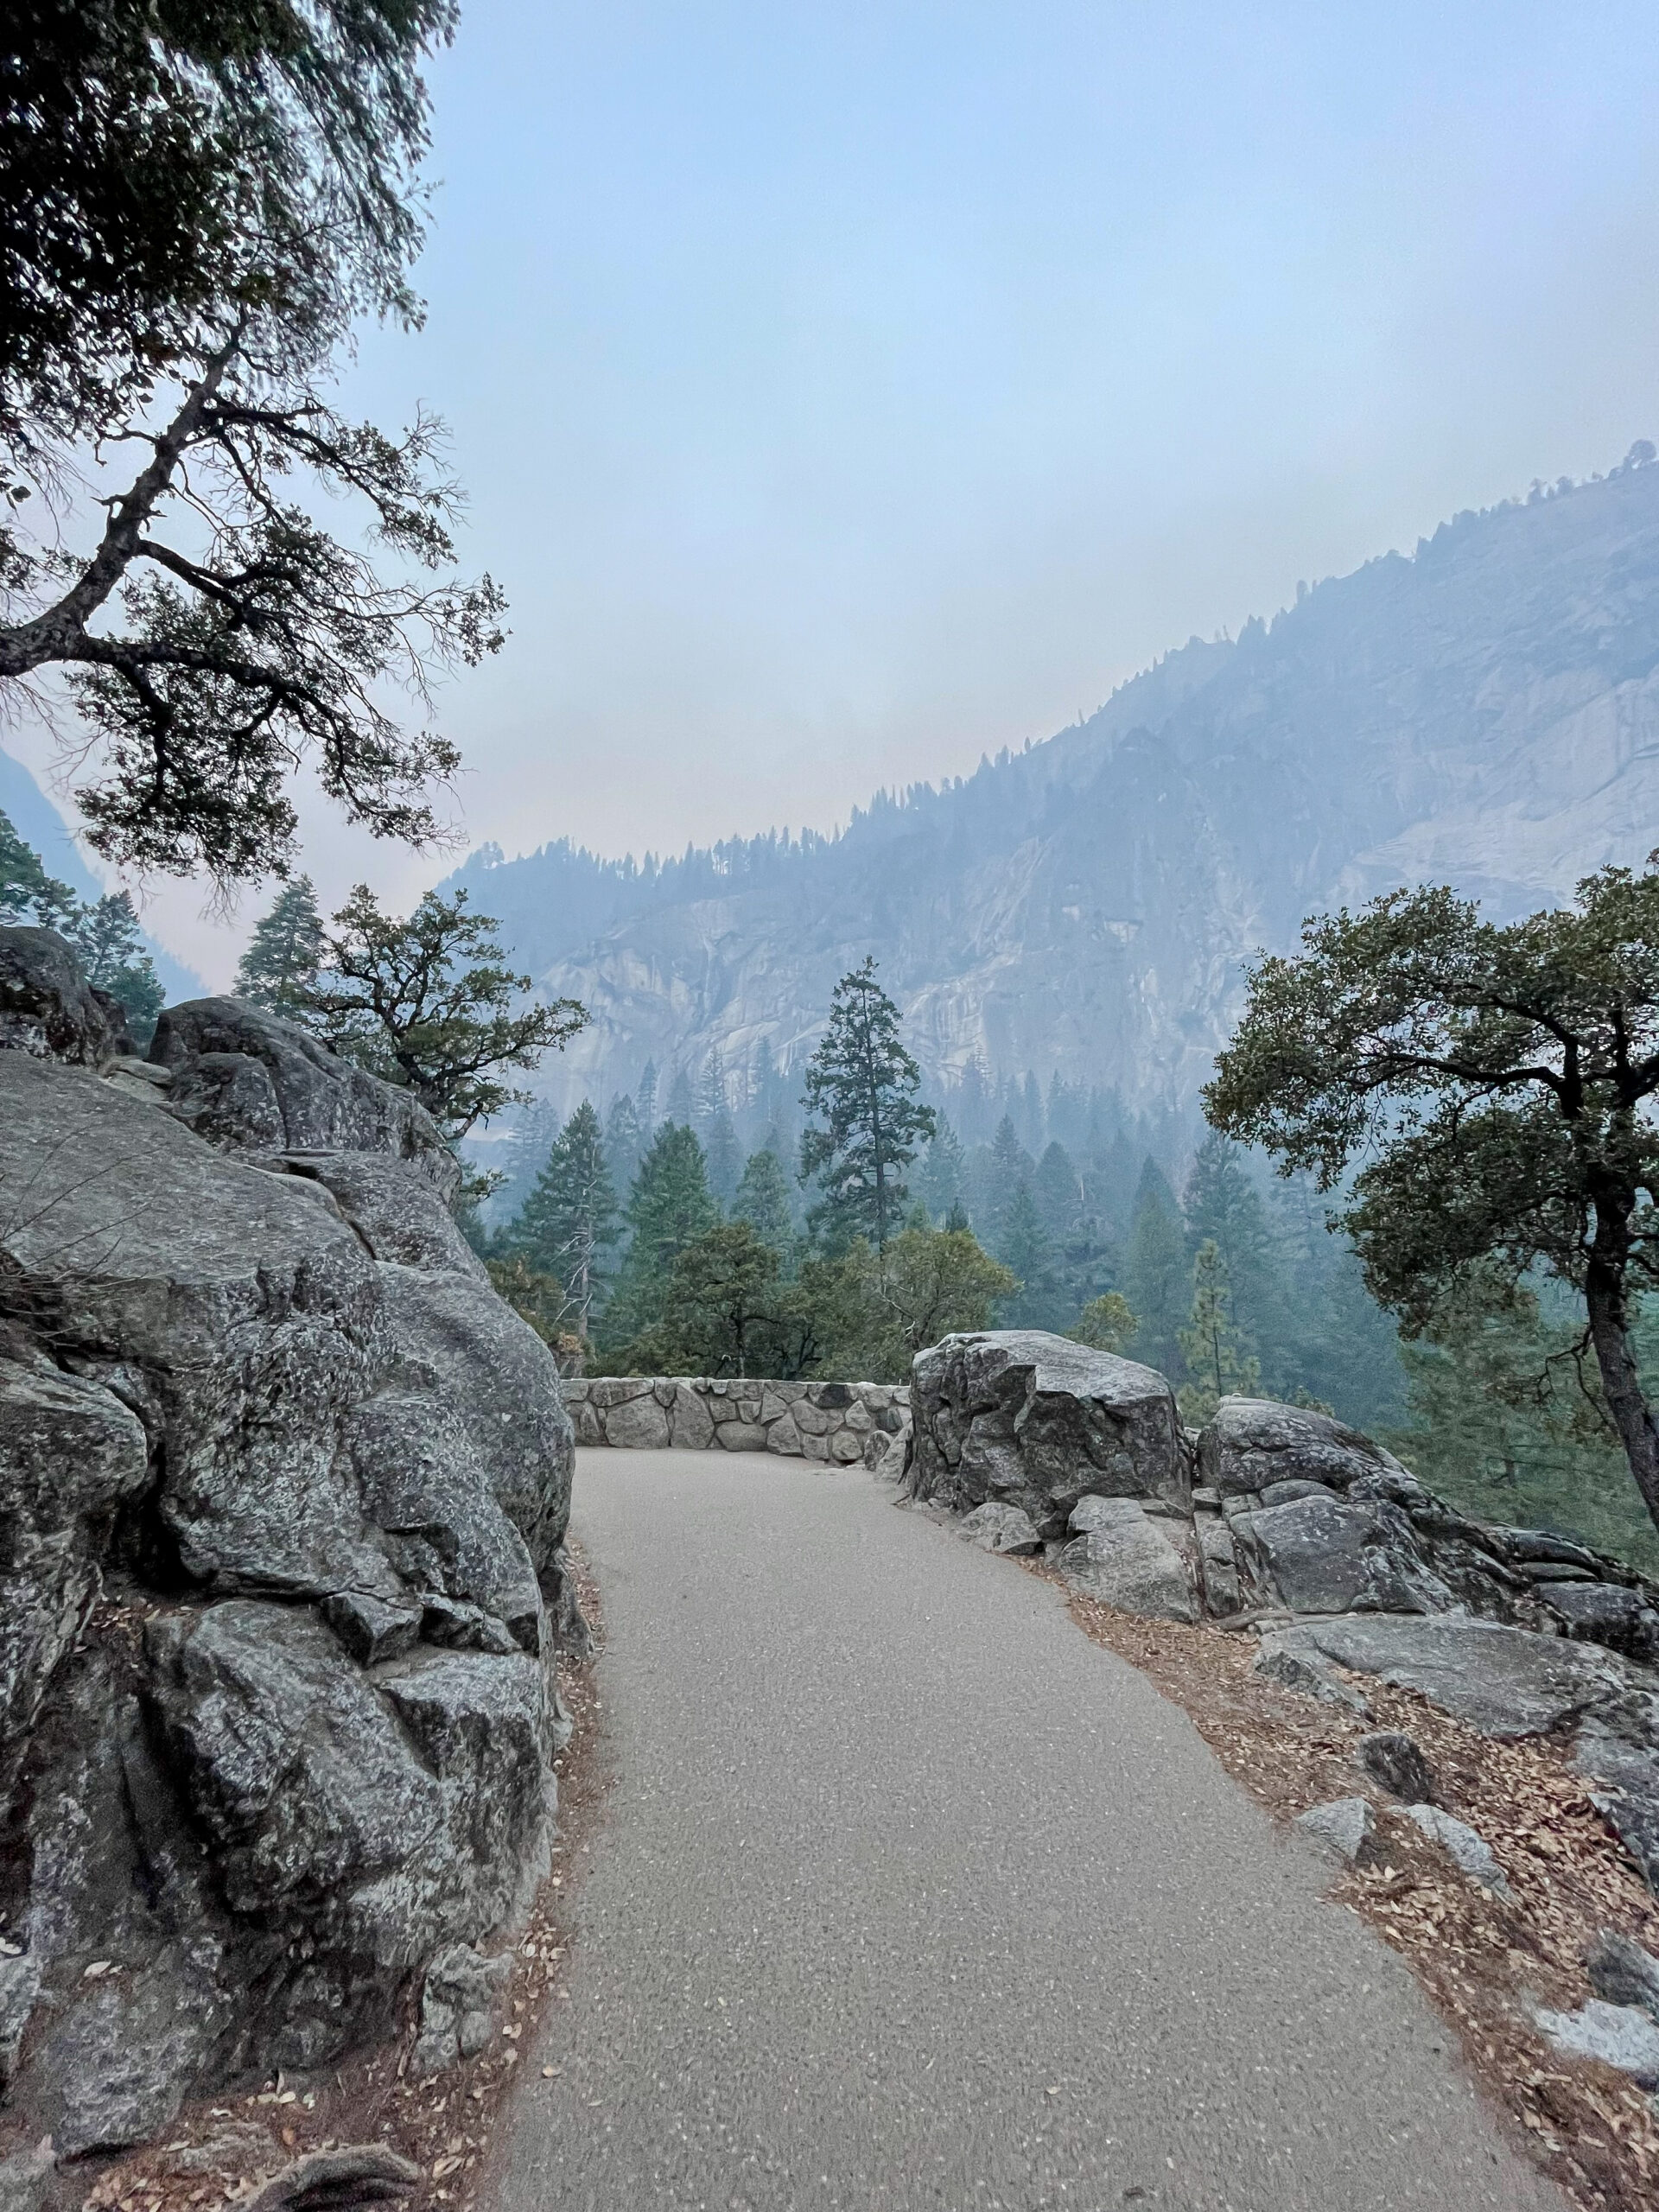
From there, the path becomes relatively flat for about a mile along the Merced River until you reach the rocky switchbacks that take you into Little Yosemite Valley.
Yosemite Valley
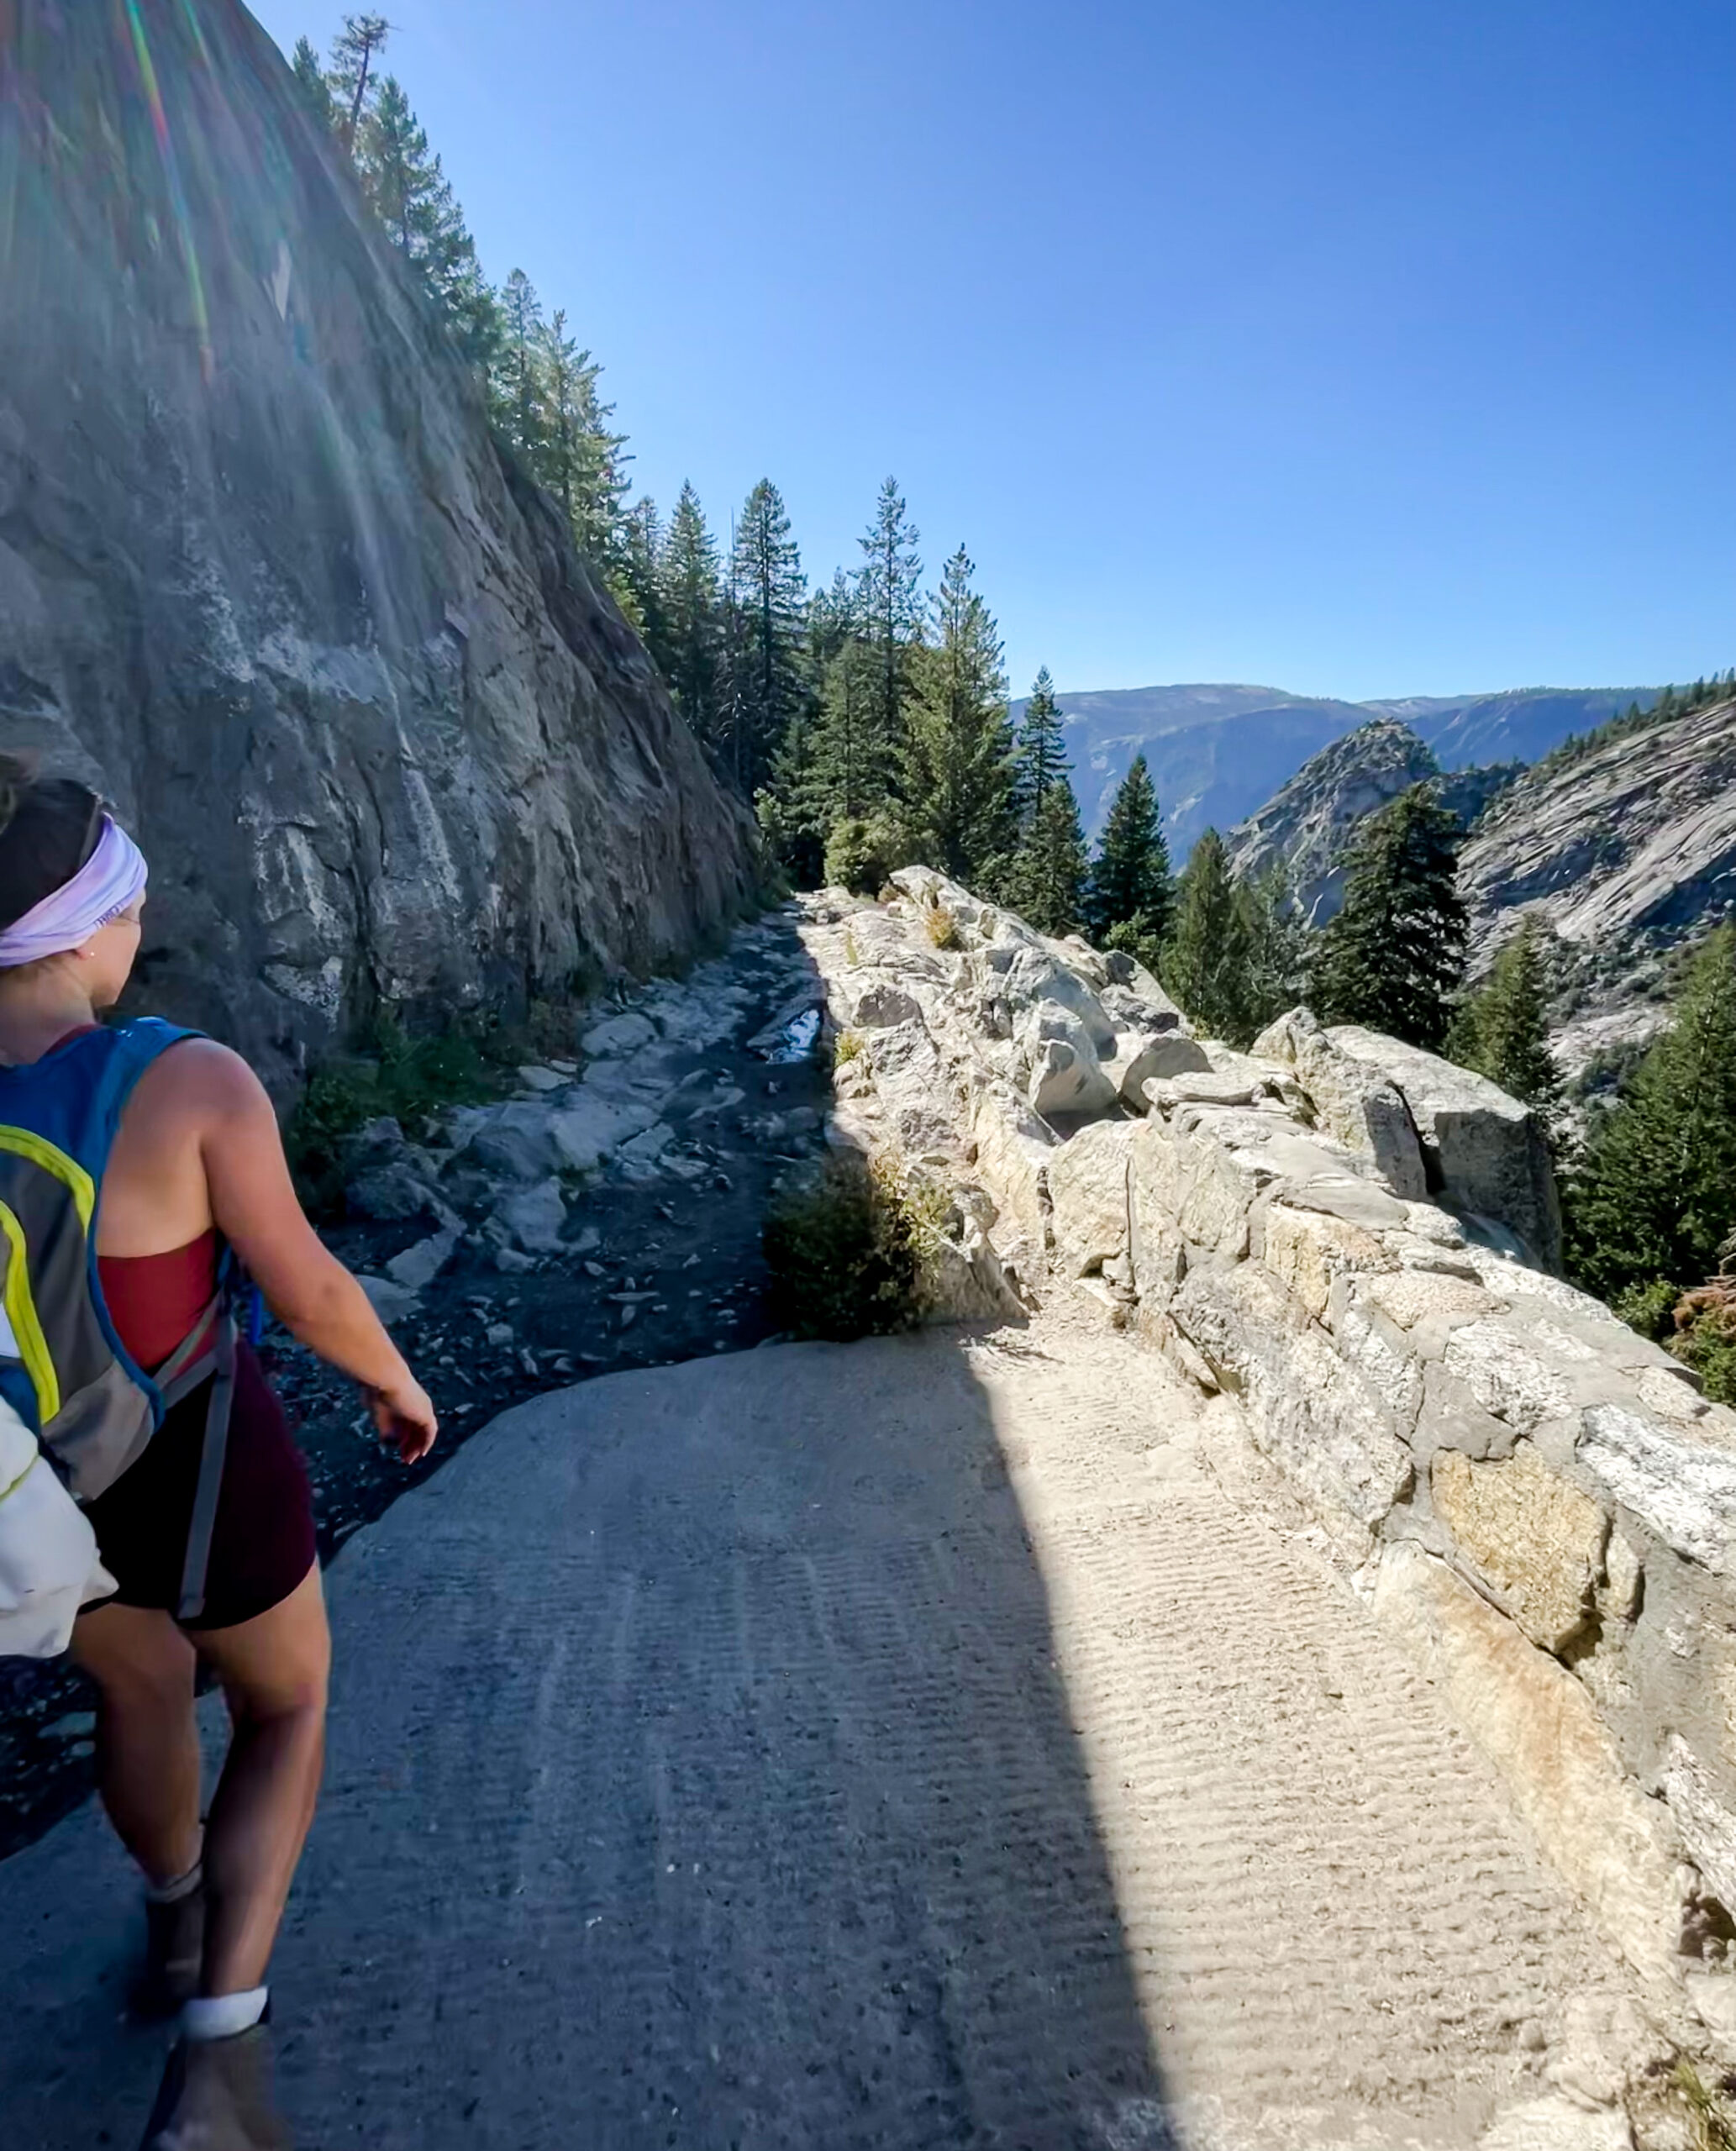
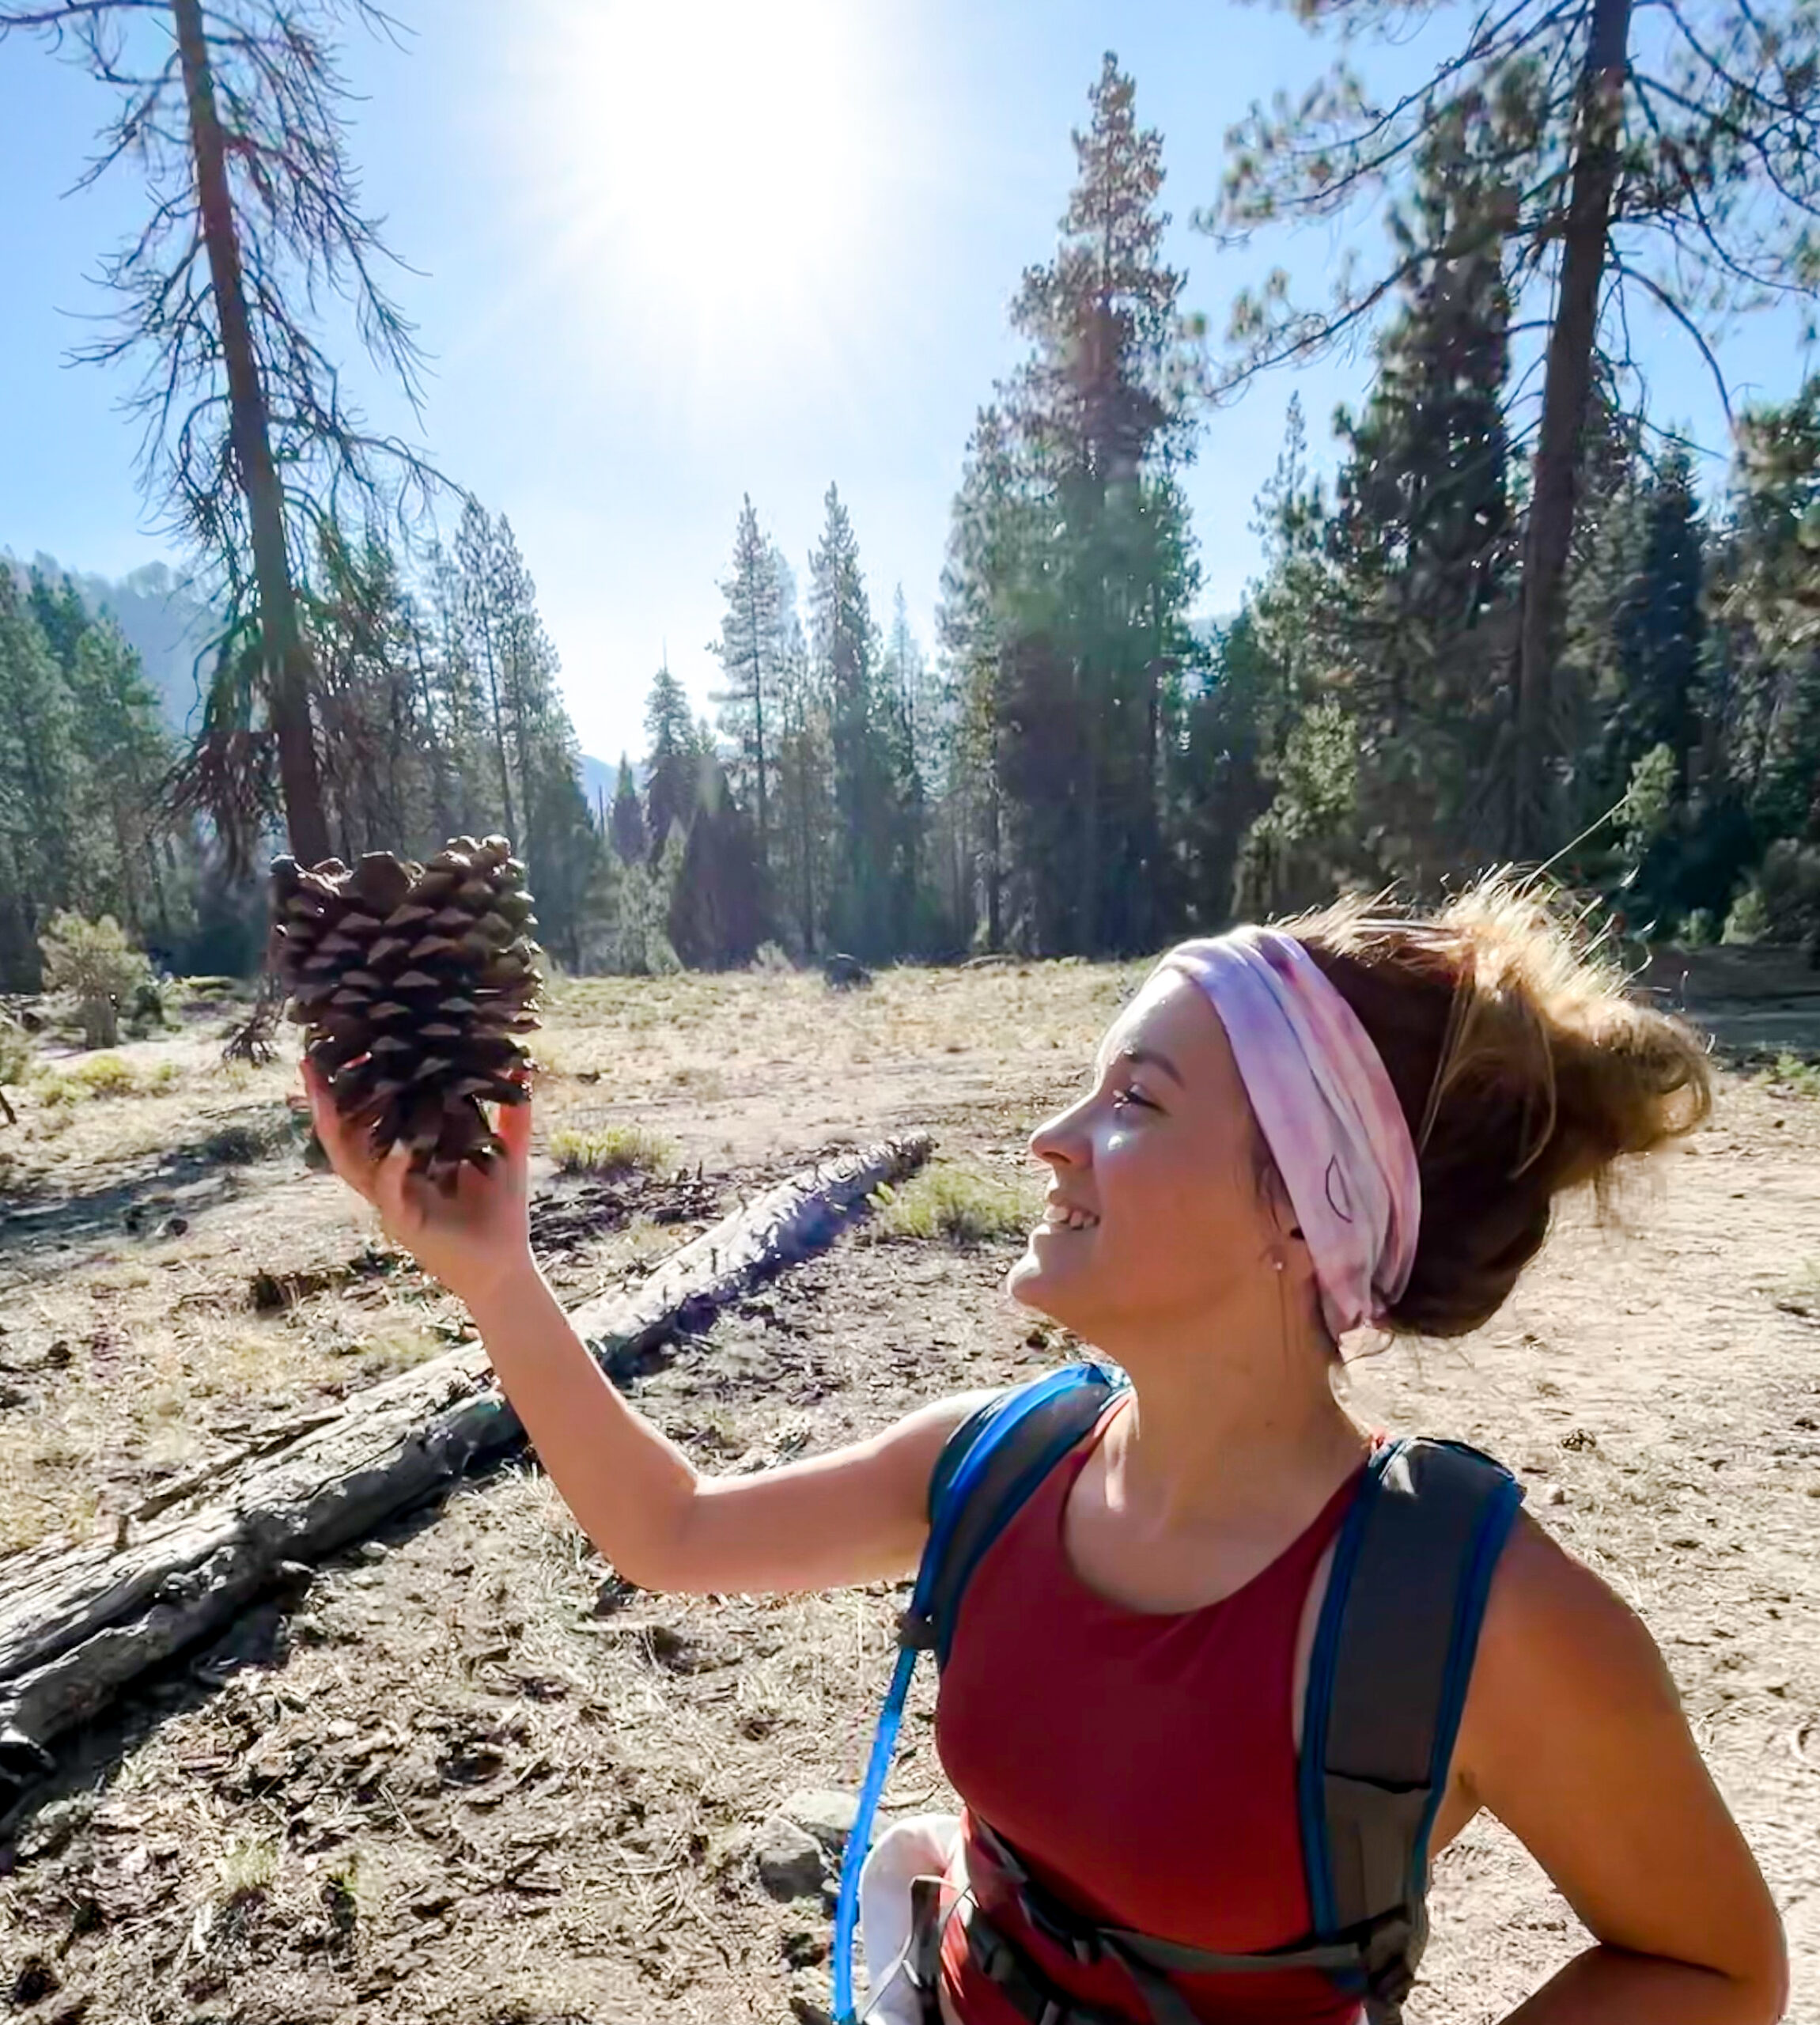
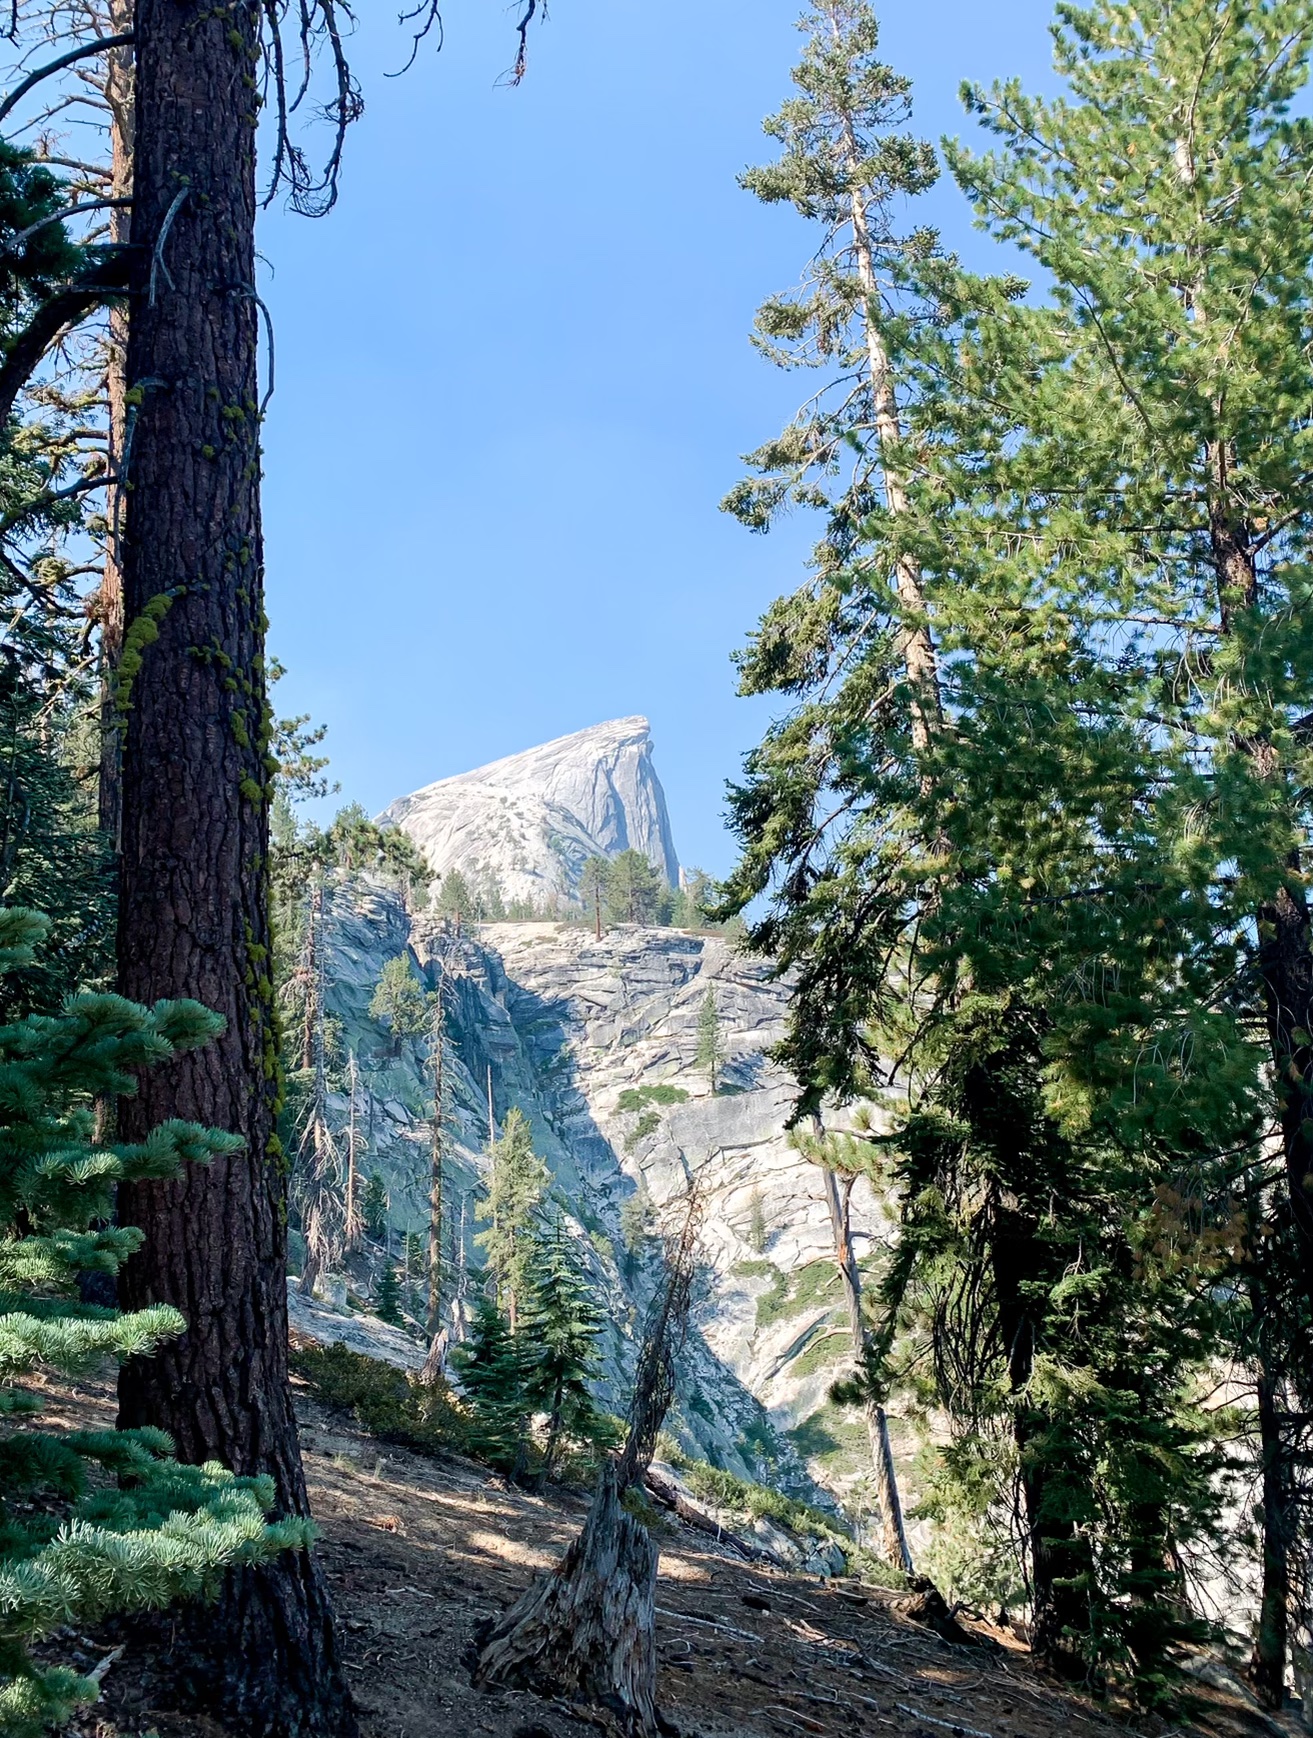
After you pass Nevada Falls, you’ll be on the Little Yosemite Trail. The trail flattens out a bit, giving your legs some much-needed rest. You can also sneak little glimpses of Half Dome through the trees in some parts, which is equally exciting and terrifying!
You’ll also encounter Little Yosemite Valley, where hikers with a Wilderness Permit can camp overnight.
This is a good opportunity to use the public restrooms, and the last chance before the summit!
This part of the hike was pretty quiet, but we enjoyed snacking and talking and finding pine cones as big as my head.
Sub-Dome
You’ll know when you reach the Sub-Dome because it starts feeling real! You’ll exit the treetops with a full view of Half Dome. There were steep steps and lots of stairs, but everything was manageable. And at this point you know you’re getting really close to the cables, so it’s just really exciting!
How to Show Your Half Dome Permit
You’ll likely encounter the Ranger Checkpoint near the end of the Sub-Dome, where they ask to see your permit before you start the climb. Be sure to have the permit and your ID on hand.
Don’t rely on cell service or digging through emails! Take a screenshot, download it or print it out.
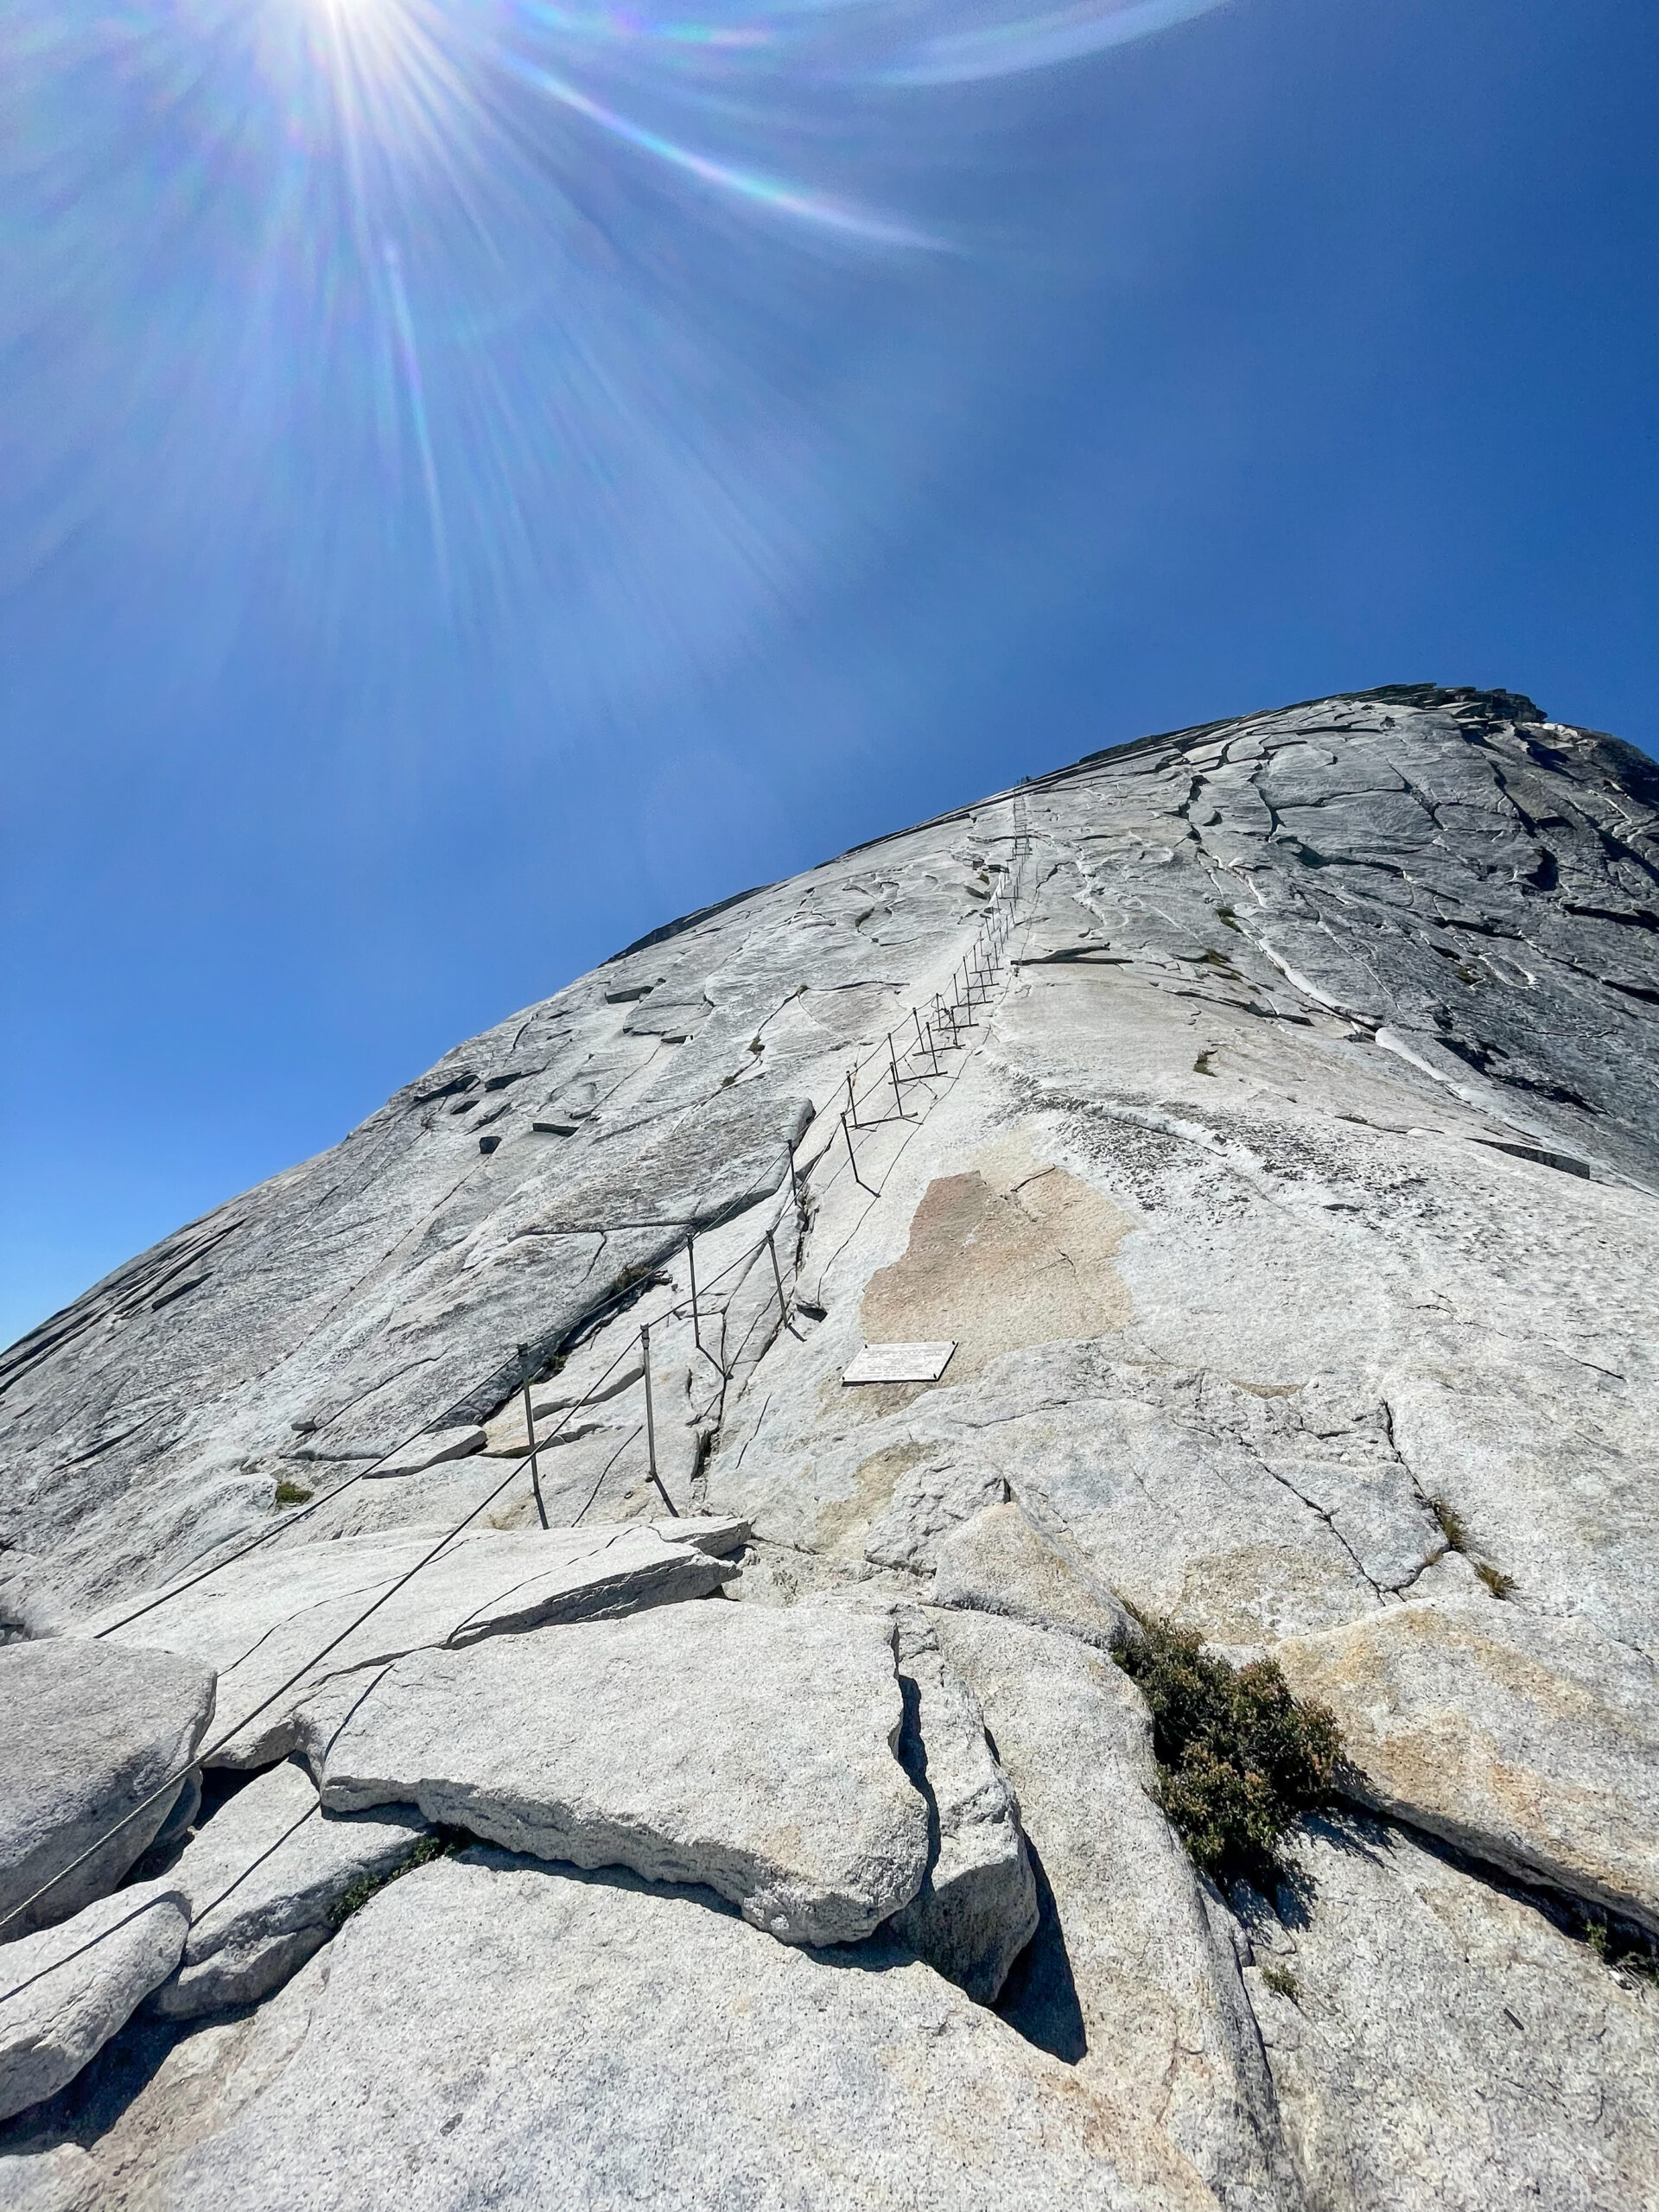
Half Dome Cables
Now for the good stuff…
In all honestly, the Half Dome cables were a bit more steep and intimidating than I imagined. But it’s definitely worth doing and something you can do safely if you take the right precautions!
Standing in front of the cables is a humbling experience. Photos can’t do it justice. It’s just a massive, straight-up climb along a giant curved rock. So insane!
As many people do, I started to get in my own head while looking up at the steep incline. But I was determined to make it to the top!

Should I Wear Gloves on the Half Dome Cables?
Definitely wear gloves on the cables. You are literally holding on for your life, and while it’s reasonable manageable, you don’t want to risky a slippery situation or sweaty hands.
I recommend ordering these gloves, which I brought with me (thanks to a friend who used them on her climb). They were comfortable, but grippy, and just the right size for small hands.
My husband decided not to bring gloves, but quickly changed his mind when he saw the cables and opted to use some that were laying at the base. I know… sort of gross, but when you’re 8,000 feet above ground it’s a small price to pay for safety.
Hikers often leave their gloves behind and there was a small collection at the base to borrow. I wouldn’t count on it, but it’s there if you need it.
Should I Wear a Harness on the Half Dome Cables?
When we were there, about 30% of people used a harness. We opted not to bring one, but I could see how it can ease your mind and provide another level of protection.
I think if anything I think it would have just relieved some stress, but if you go at the right pace and move safely you can do it without a harness.
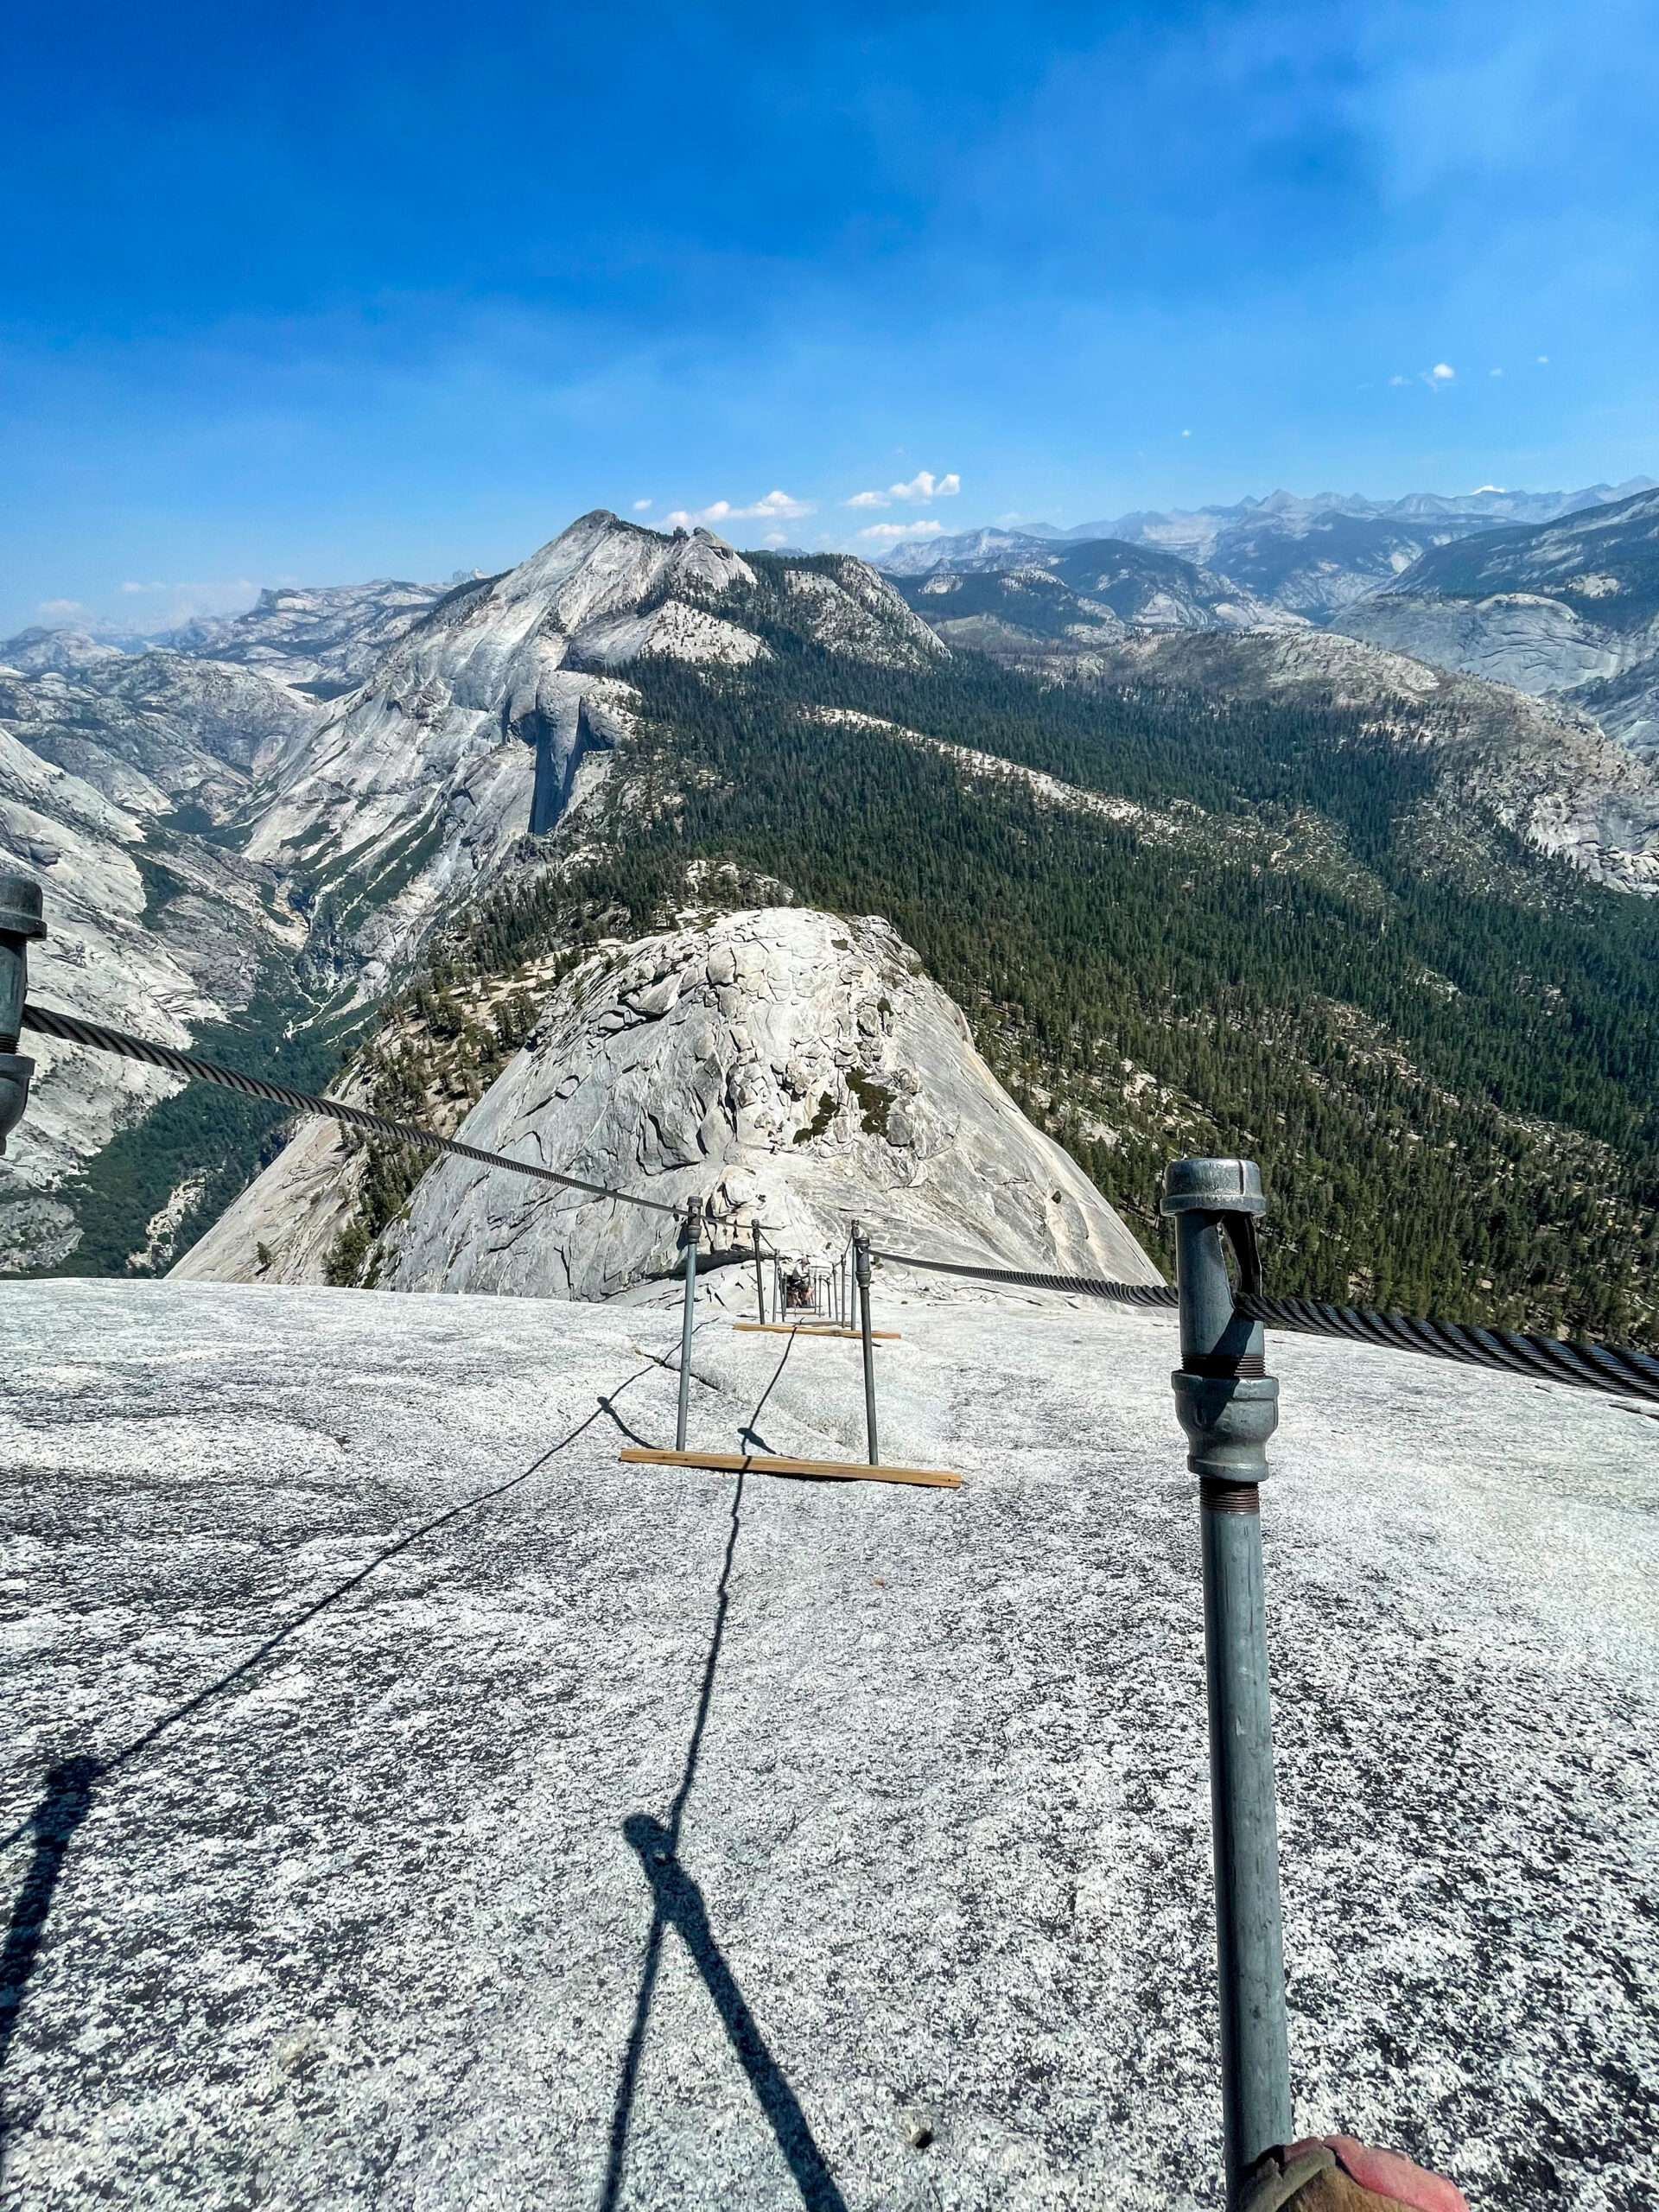
Climbing the Cables
The cable climb is about 400 feet and took us around 20-25 minutes. Wood planks are bolted to the ground at each pole, making it easy to rest your weight and move at a comfortable pace. I decided not to look down and just focus on getting from one plank to the next.
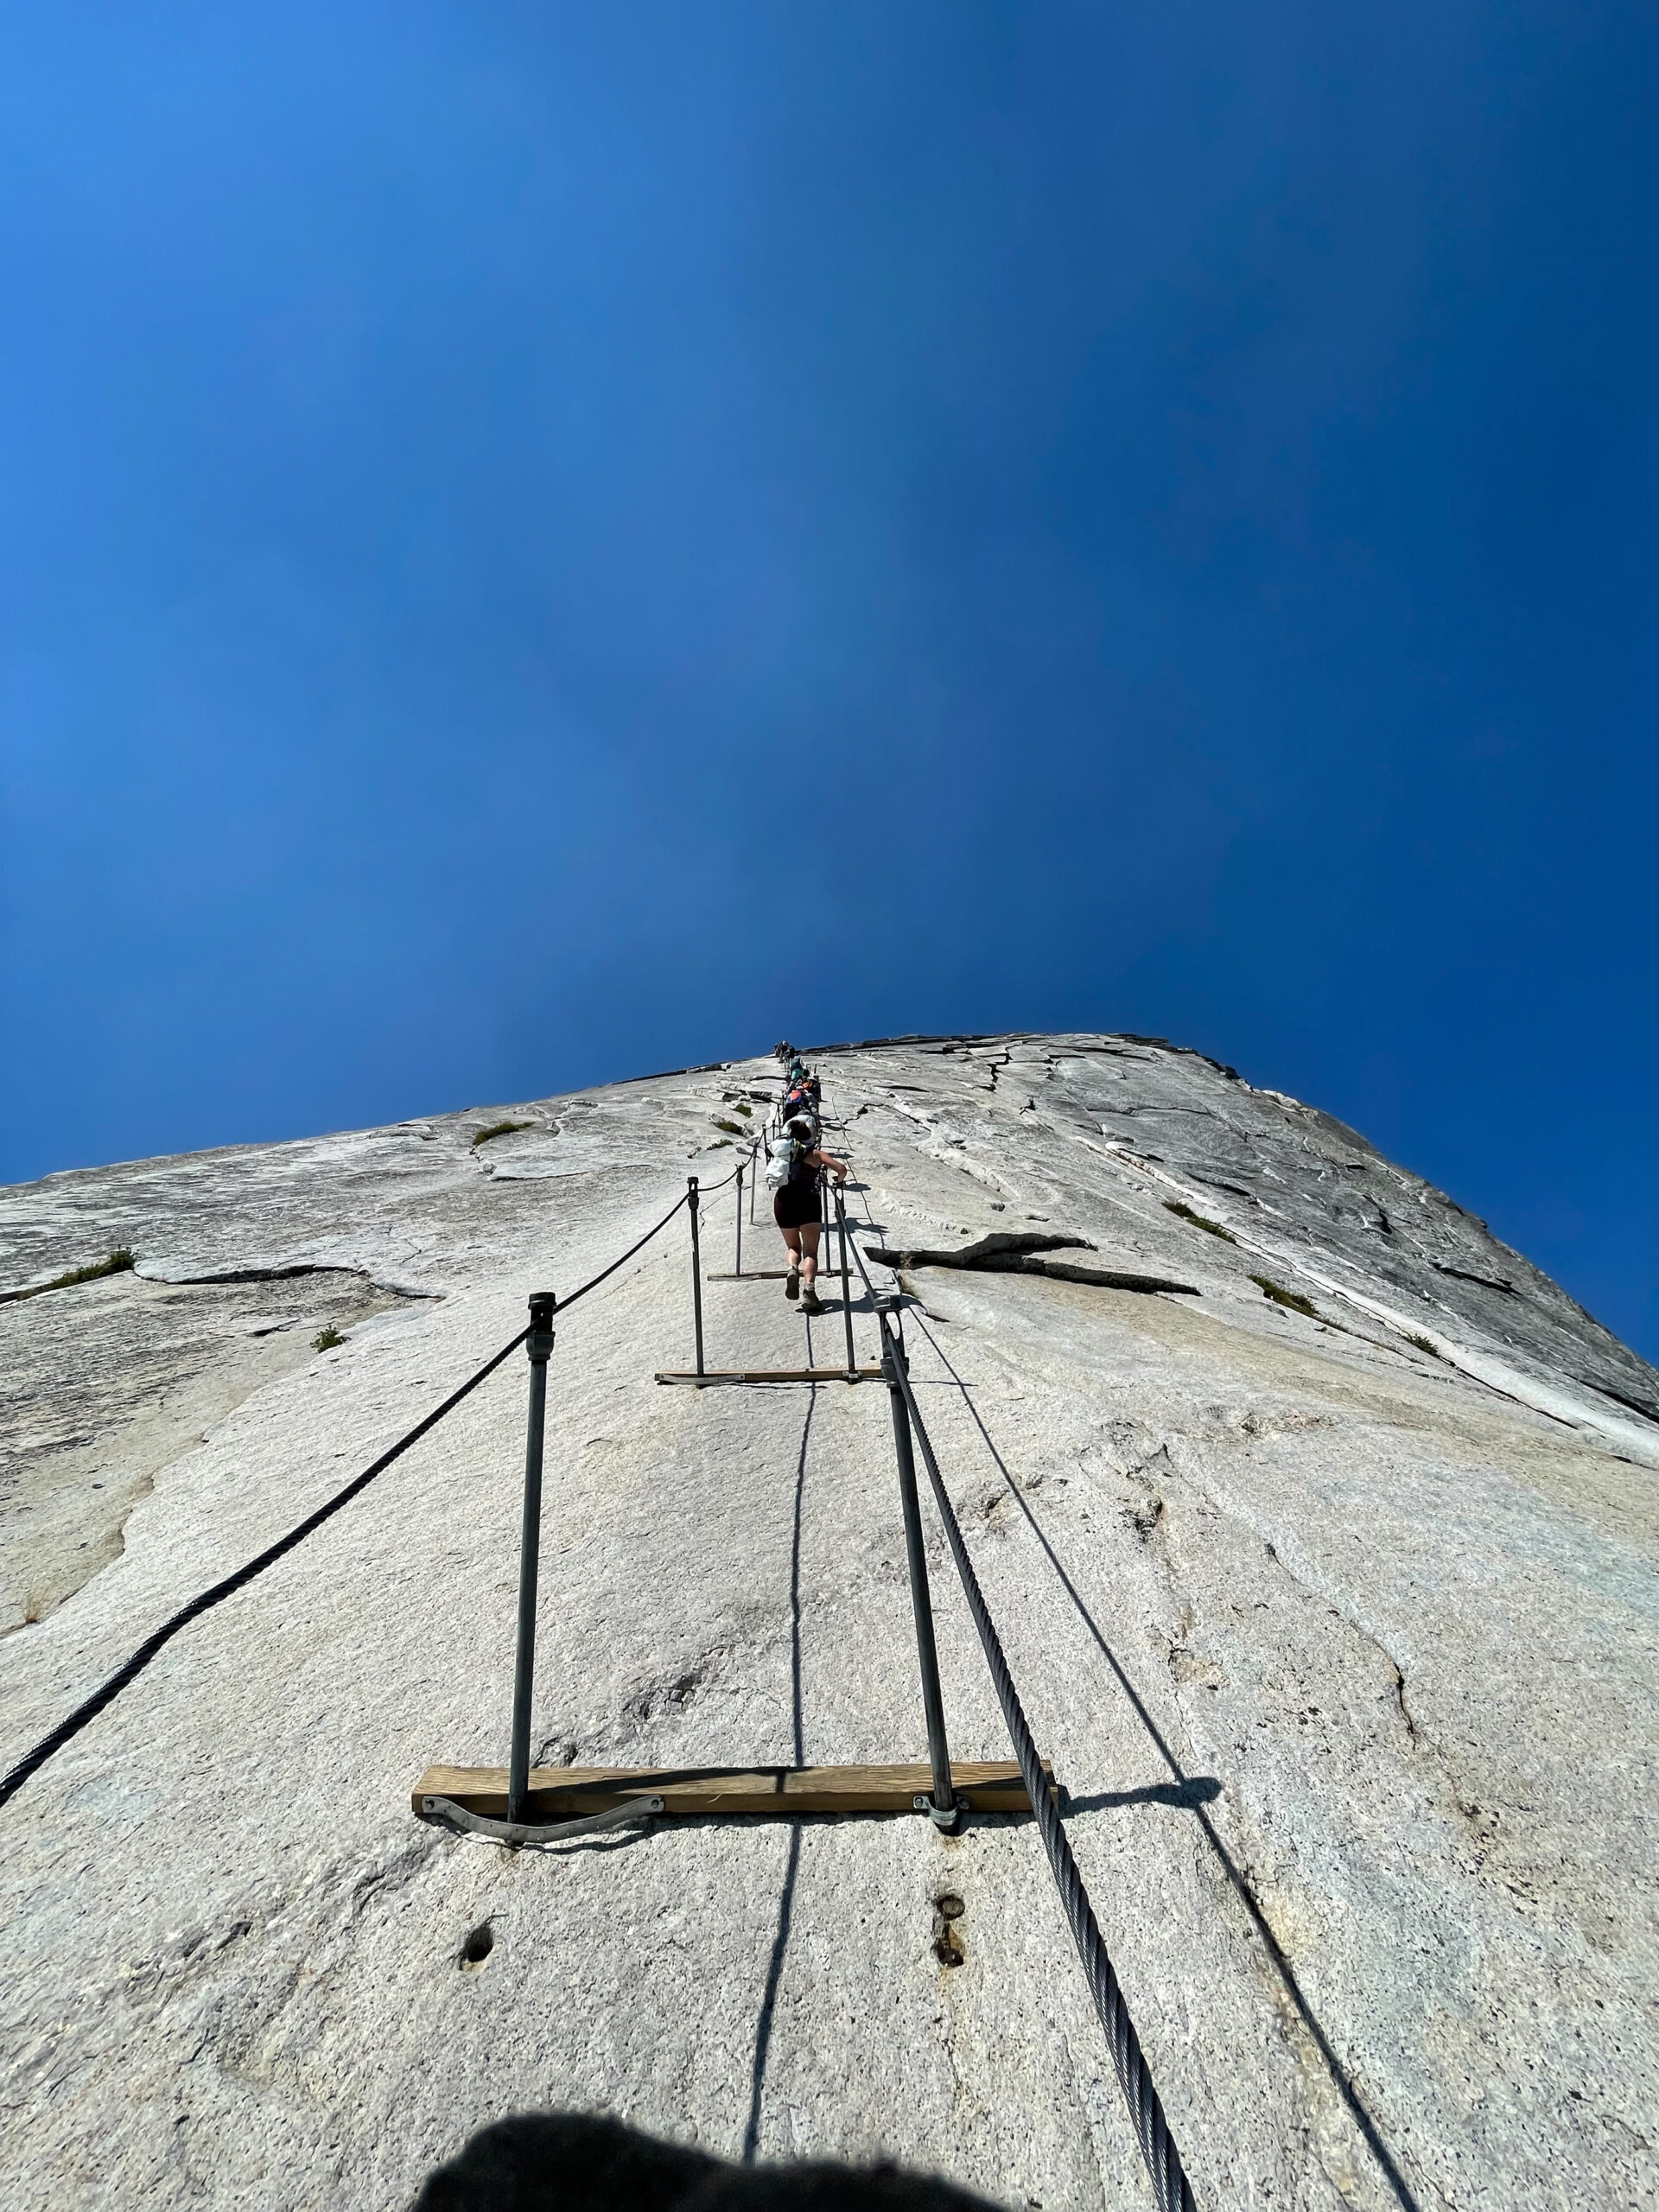
I didn’t realize prior to starting the cables that you hike up holding onto one cable and down the other. I sort of imagined holding both cables on the way up and down. In hindsight that doesn’t really make sense, but nonetheless I was surprised. It worked quiet well and I always felt I had plenty of room when people passed by on the other side.
There were moments that it got really steep and at one point I definitely hit panic mode for a brief moment. But the man in front of me saw my fear and was super encouraging! He told me to keep going and gave me the little push I needed to suck it up and make it happen. Gotta love the kidness of strangers!
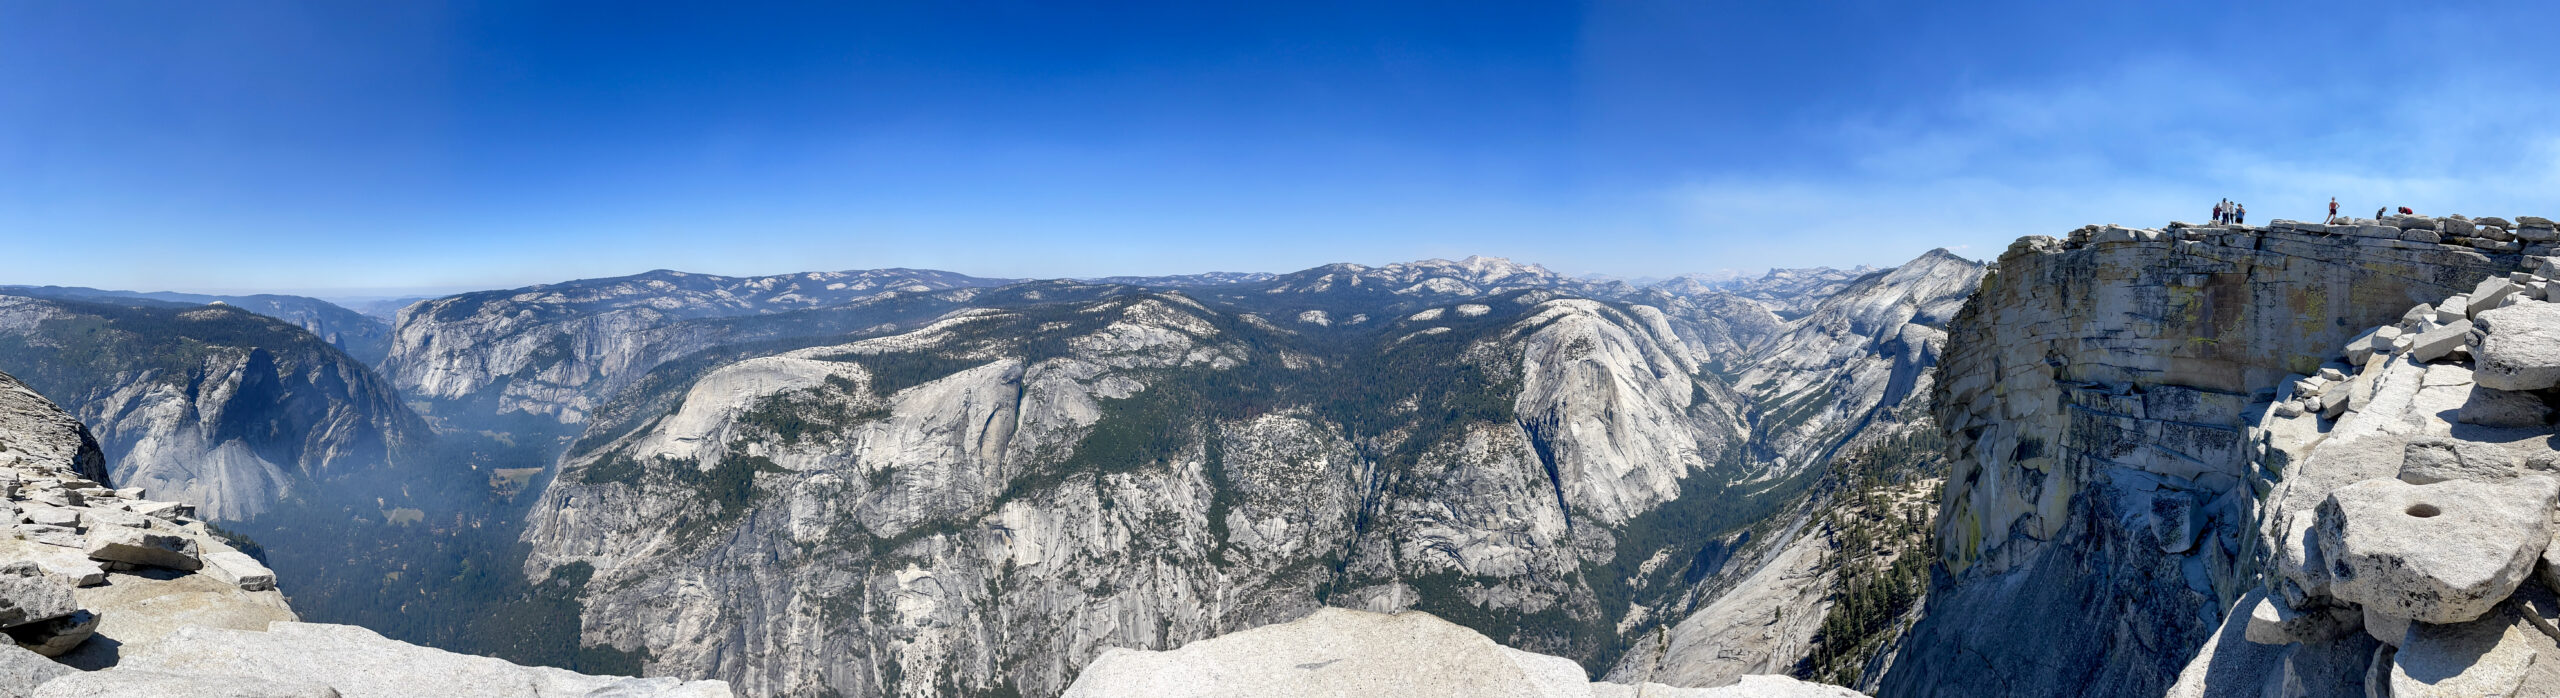
Summit
Everything you’ve gone through to this point is all worth the incredible views at the top and the sense of accomplishment you will feel. It’s all downhill from here, literally!
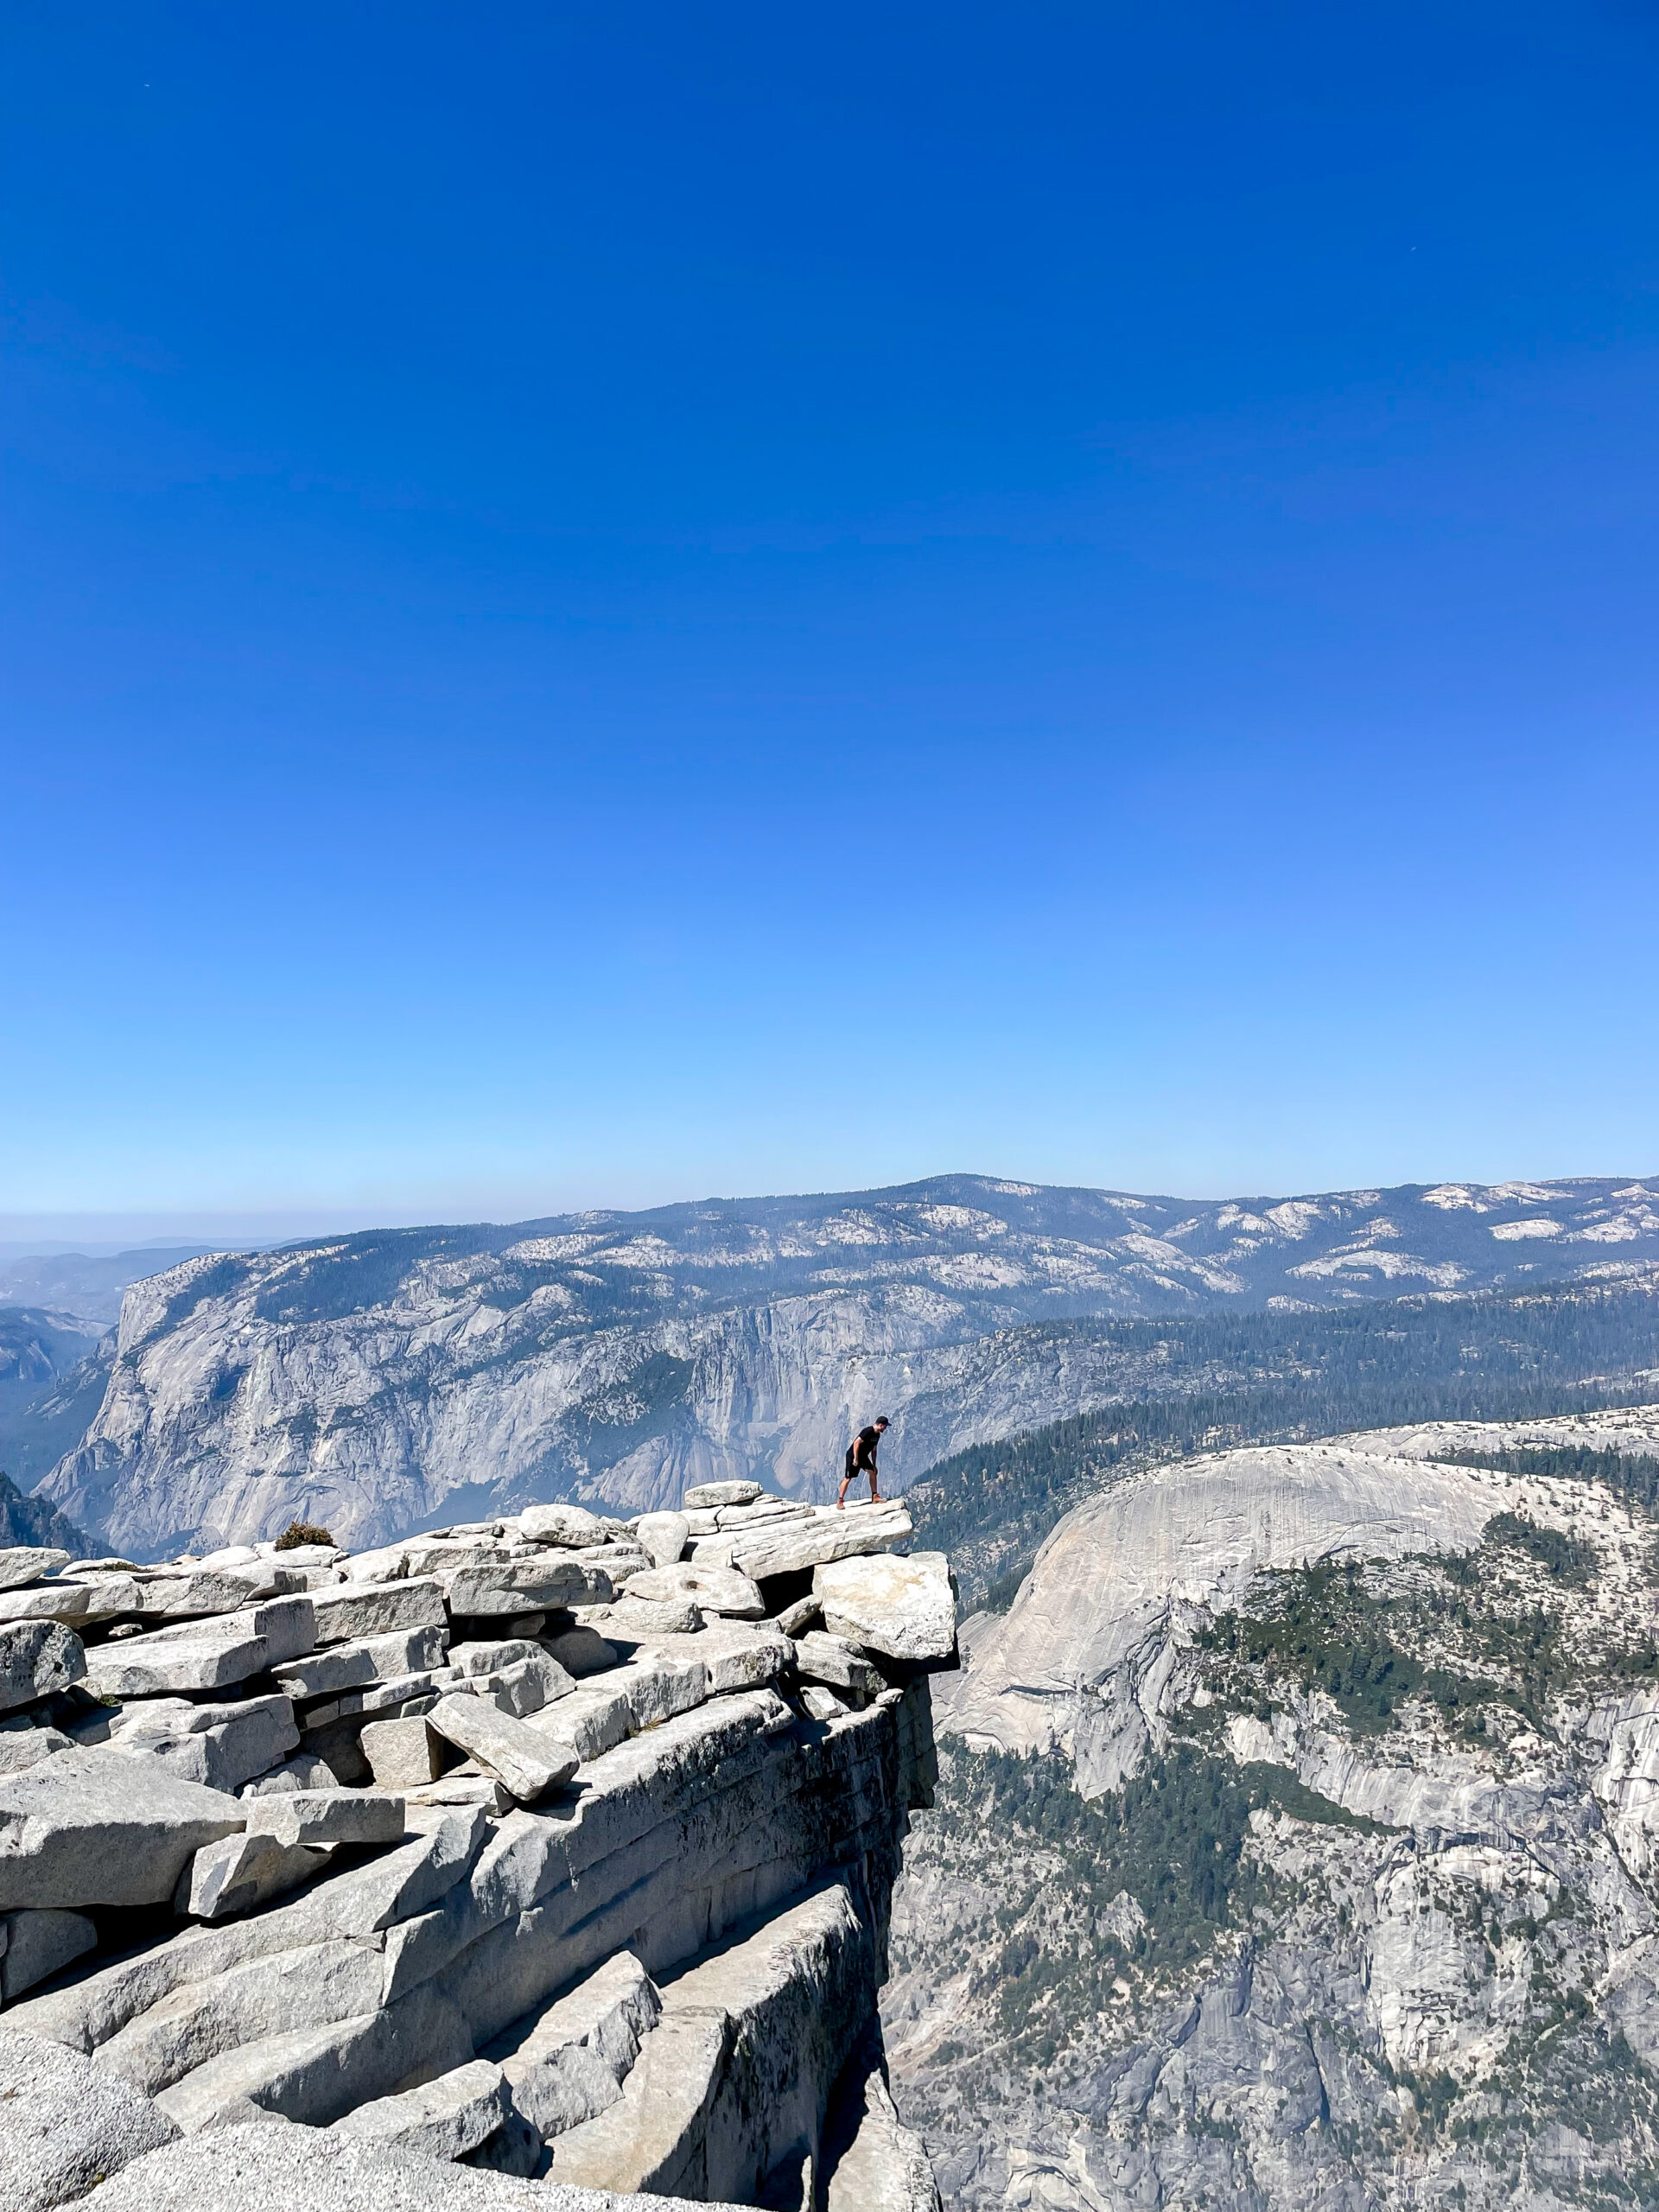
If you’re not afraid of heights, there’s a ledge that peeks out over the tip of Half Dome for a really cool view and photo spot. My legs were too wobbly, but my husband took the opportunity and loved every second.
The other surprising part is that you won’t spend much time at the Summit. After lunch and a break, you’ll need to start the descent so that you can make the 8 mile journey back before dark. But it was definitely worth it. We took about 30 minutes total to rest at the summit and I didn’t feel rushed.
Descending Half Dome
Taking the cables down the mountain was actually easier than I thought. Probably beause you don’t look down much, haha. It felt secure and I never felt unstable. The upward climb was actually more stressful.
And now that you’ve made it past the cables, it’s time for the long hike back down the trail head. As I mentioned, we took the John Muir trail back which was 1.5 miles longer but less steep. You could opt for the Mist Trail instead to save some time.
Ready to Hike Half Dome?
Hiking Half Dome in Yosemite is both one of the most incredible and difficult things I’ve ever done. I spent the whole day in awe of the scenery and so thankful for the chance to experience it. All I could think about was how God placed us in a moment in history where there are now man-made cables so that we can climb up the face of this mountain. How cool is that?
It is definitely not for everyone, but I hope this inspires you if you are considering it. Be prepared and be safe, but go freaking do it!
Happy travels, friends!
-Hannah
Pin it for later!

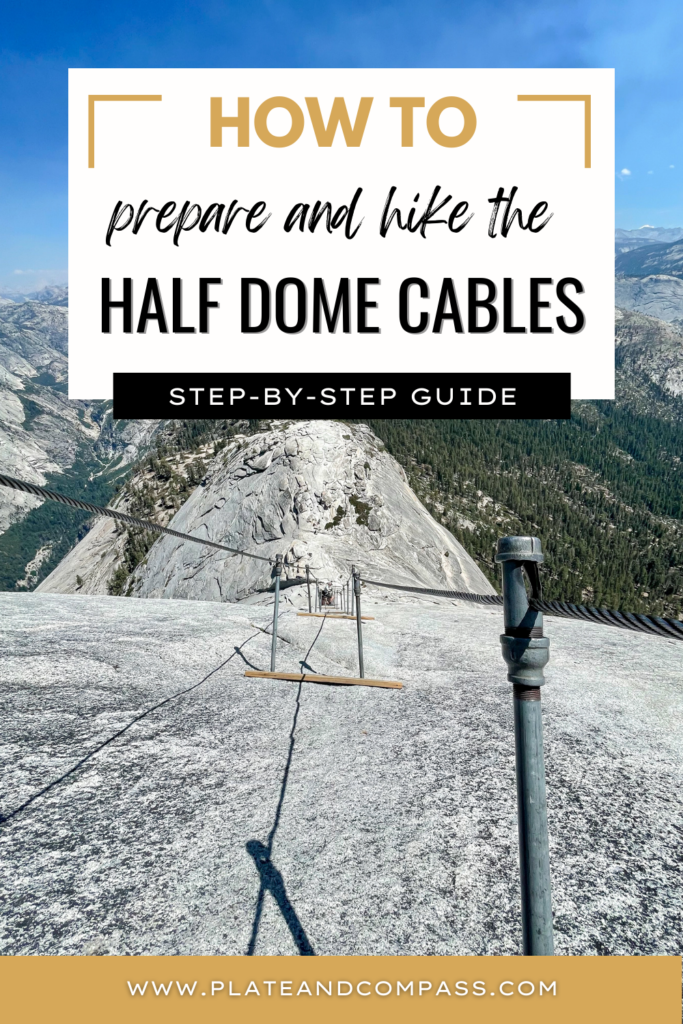
Plate & Compass
Plate & Compass is a food and travel blog written by Hannah Falkosky. After quitting her job and spending 8 weeks in Europe on just a few thousand dollars, she found her love for budget travel and sharing tips to help others explore the world. She also spent 15 years working with award-winning chefs and developed a love for artful food and cocktails. Hannah is now based out of Los Angeles, and when she’s not traveling she makes it her mission to explore the best restaurants and cocktail bars while living life to the fullest.


One Comment
Pingback: